The Orca Scan mobile app is used to quickly get a custom barcode scanner up and running on mobile devices and Android-based hardware scanners, capturing much richer data to sit alongside scanned barcodes, such as photos, GPS locations, date and time stamps, and many more!
The Basics
The mobile app is available on iOS and Android devices and can be installed on supported hardware. Once you’ve downloaded the Orca Scan mobile app, you’ll be asked to log in to your Orca Scan account or to create an account if you haven’t got one already – this can be done on the mobile app or the Orca Scan web app.
Great! Now let’s explore the mobile interface to uncover the many features and to find out where they live.
Only in the web app
You can only sign up for an Orca Scan subscription at orcascan.com, along with adding users to a sheet (including setting permissions), importing data and accessing integrations, triggers and history logs.
Sheet permissions
The person who creates the sheet is considered the owner and has full access to modify the sheet. When adding users to a sheet to collaborate, you can control who can add/edit/update using sheet permissions. There are 4 permissions Can update, Can delete, Can export and Can admin:
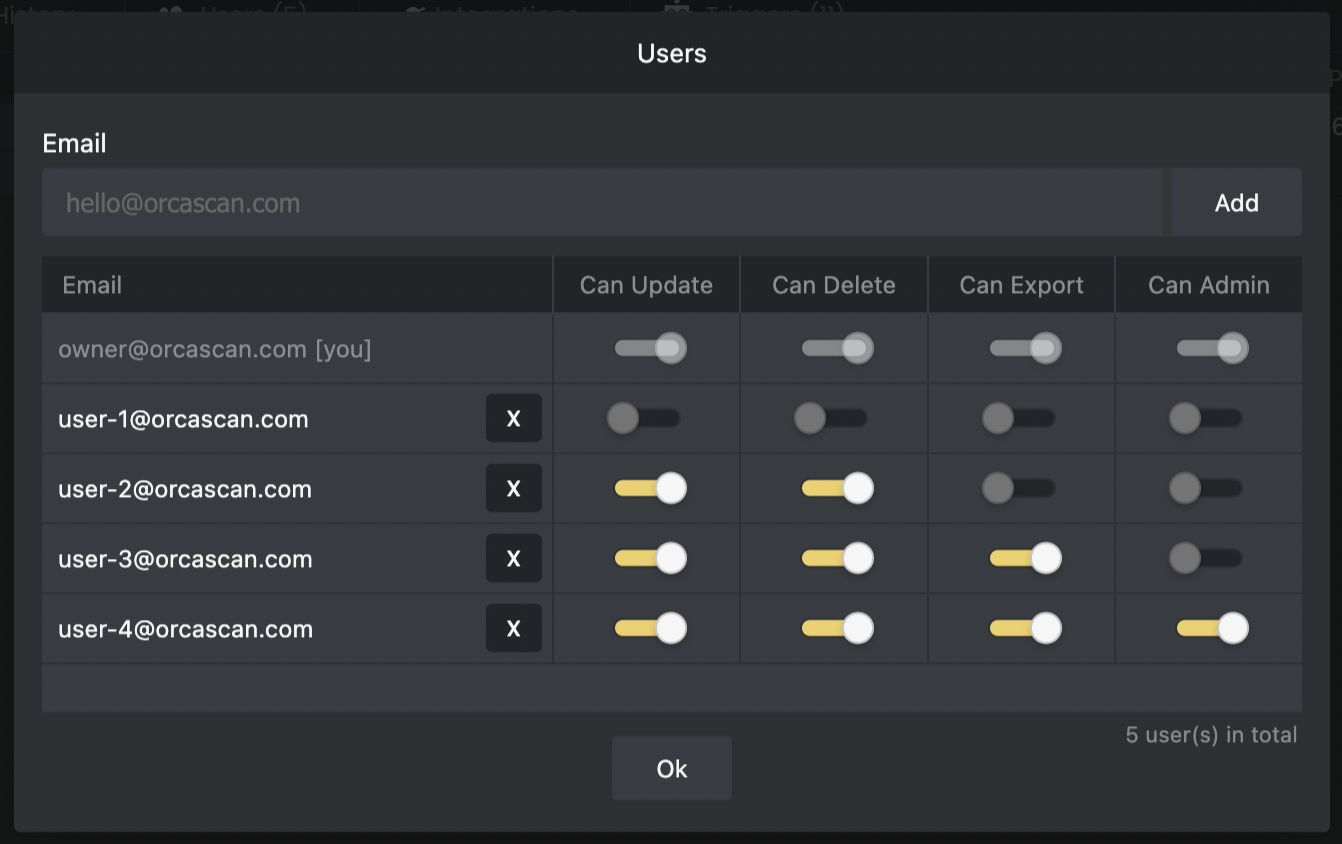
Can Update
A user with Can Update enabled has the ability to add and update rows from both the web and mobile app.
Can Delete
A user with Can Delete enabled has the ability to delete rows and also clear the sheet from the web or mobile app.
Can Export
A user with Can Export enabled has the ability to export the entire contents of your sheet via email from the mobile app or download the data using the web app.
Can Admin
A user with Can Admin enabled has all of the above permissions, plus the ability to modify the structure of your sheet, such as adding/editing columns. They do not, however, have the ability to add new users - this can only be done by the sheet owner.
Learn more about adding users and setting user permissions.
Supported barcodes
Here’s a list of all of the supported barcodes (also known as symbologies):
| Barcode Type | Android | iOS | Hardware / Bluetooth scanner |
|---|---|---|---|
| PDF417 | ✔ | ✔ | check manual |
| Code 39 | ✔ | ✔ | check manual |
| Data Matrix | ✔ | ✔ | check manual |
| Code 128 | ✔ | ✔ | check manual |
| EAN 8 | ✔ | ✔ | check manual |
| ITF | ✔ | ✔ | check manual |
| Aztec | ✔ | ✔ | check manual |
| Code 93 | ✔ | ✔ | check manual |
| EAN 13 | ✔ | ✔ | check manual |
| UPC A | ✔ | ✔ | check manual |
| UPC E | ✔ | ✔ | check manual |
| QR Code | ✔ | ✔ | check manual |
Supported hardware scanners
- Symbol CS4070
- Zebra MC3300
- Zebra TC51
- Zebra TC52-HC
- Linea Pro 7i
- Datalogic Memor 20
- Honeywell CT40
- Wasp WWS650
- CipherLab RS35
- Munbyn IPDA056
- Saveo Pocket Scan
- Saveo Scan BOLT
- Saveo Scan Ring
Scanning barcodes
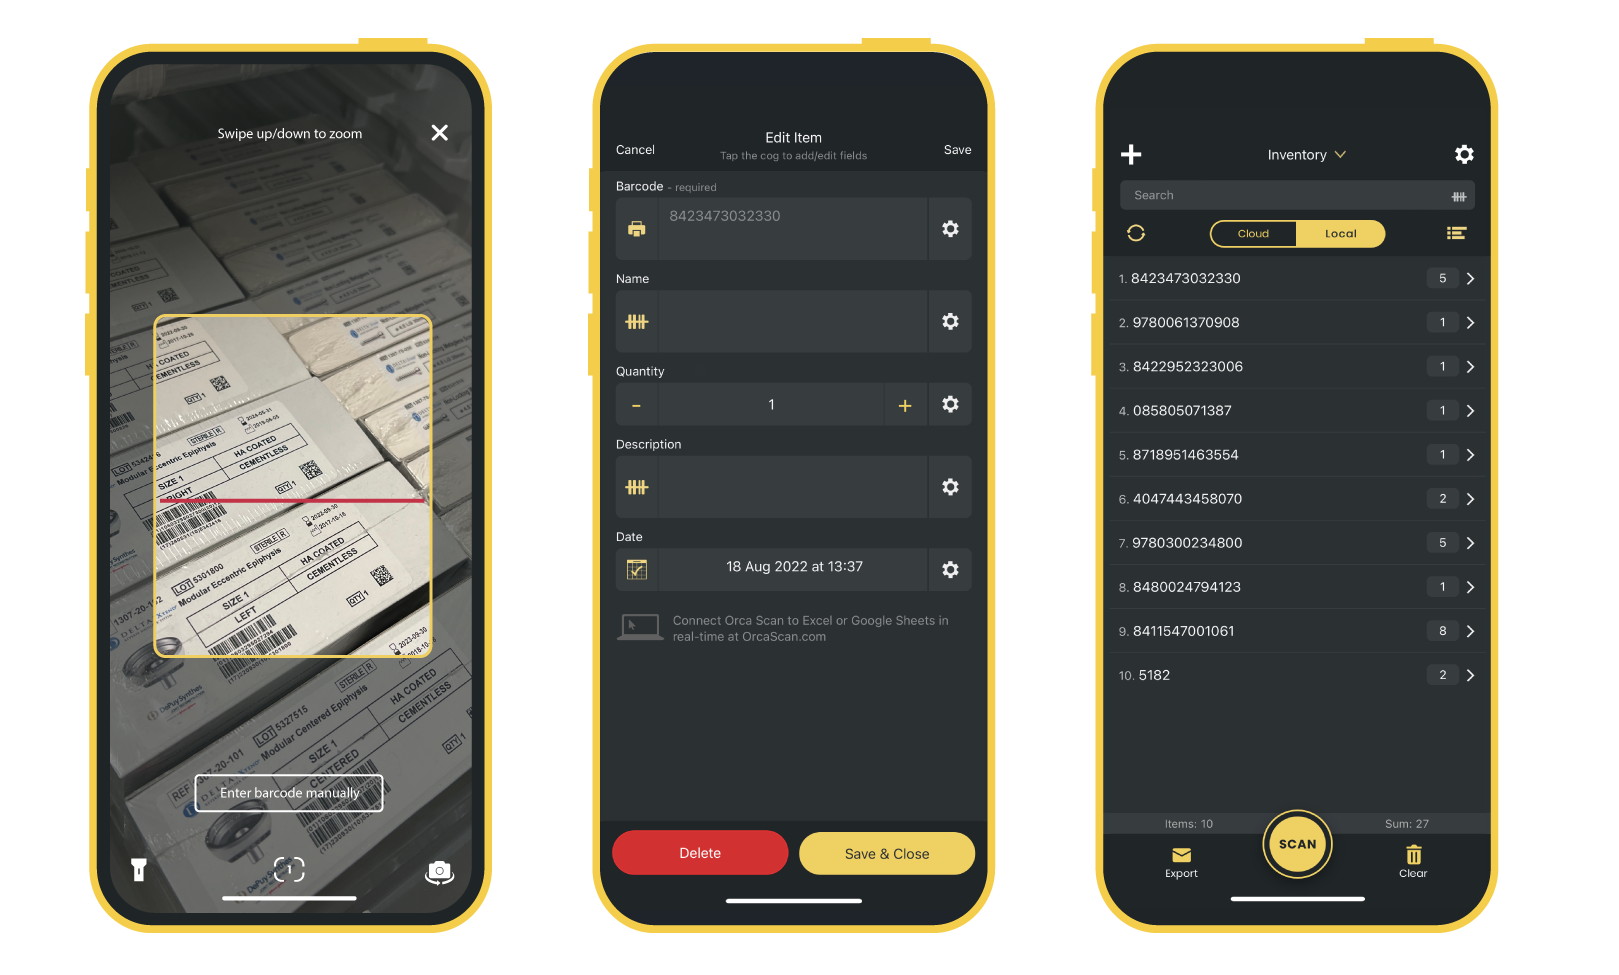
As soon as you log in to the mobile app, you’ll be presented with a large scan button. Once pressed, you’ll activate the scanner using your mobile’s rear camera as default. Use the bottom right button to switch between the front and rear cameras. If the environment is a little too dark, tap the bottom left button to turn on the camera flash (this will only be available for the rear camera). To exit, hit the ‘X’ button in the top right corner.
Now, you may notice a feature to enter the barcode manually – this is handy when a barcode is broken.
The button towards the bottom of the app with a number inside allows you to toggle between different barcode scanning frames.
When you’re ready, scan a barcode, fill in the required fields, and save and close.
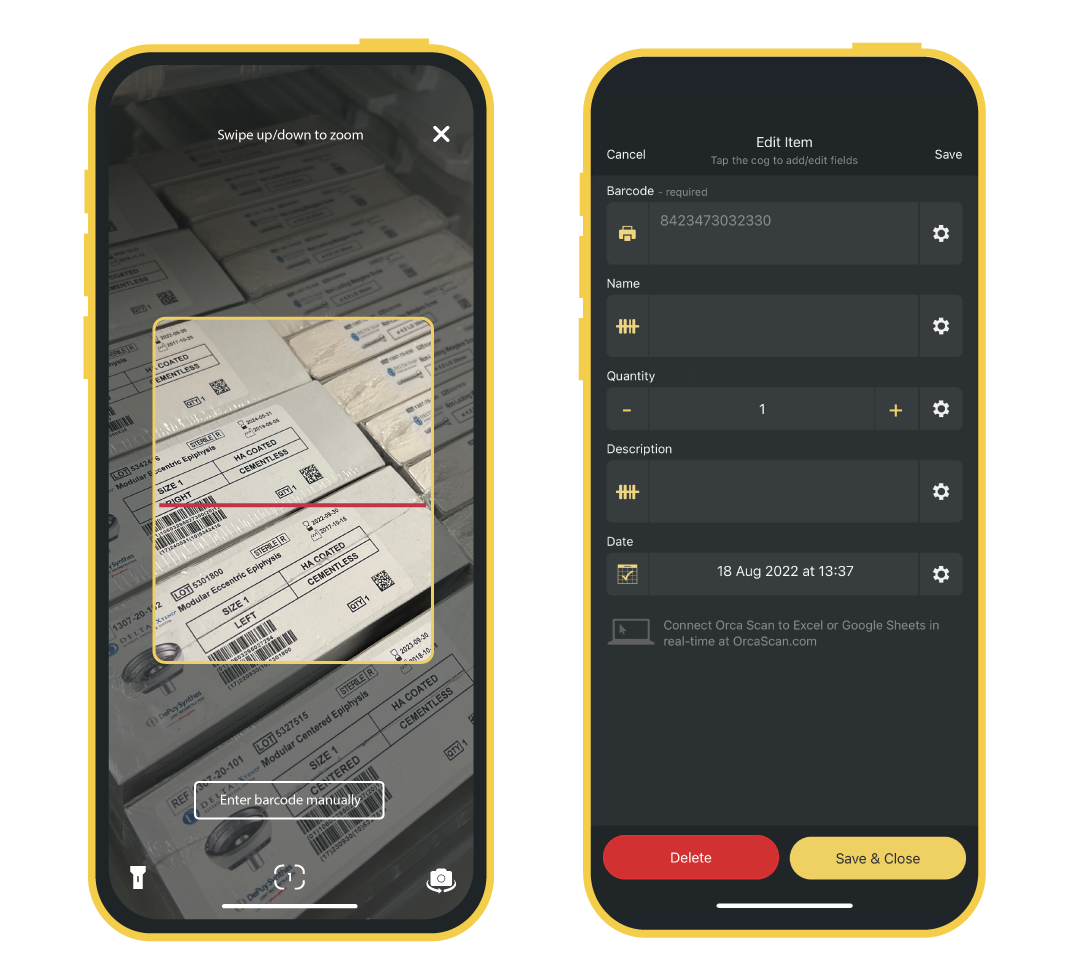
Adding items
To manually add an item without scanning, simply hit the ‘+’ button to show the ‘Add item’ menu along with all of the available data fields – tap the field and fill key in the required data, then save and close.
Creating and switching sheets
Creating a sheet is easy. Towards the top of the mobile app, you’ll see the name of your current sheet with a dropdown icon. If you tap this, you’ll see a list of all of your sheets – to switch sheets, just tap the one you want to work on and to create a new one, hit the ‘Add’ button on the top right (and select the template you wish to use).
To delete or rename the sheet, tap the ‘Edit’ button on the top left. This will show a “-” button next to the sheet names. To delete a sheet, tap this and to rename a sheet just tap the sheet name… and viola!
Creating and editing data fields
To add and edit new data fields, there are three ways to go about it.
- Tap the ‘+’ button on the top left of the app to add a new item, then hit the cog icon in any item field to bring up a set of item options – here, you should see an ‘Add field’ and ‘Edit field’ options.
- As soon as you scan a barcode, you’ll be presented with an ‘Edit item’ menu; tap the cog icon on any field to show the item field menu and select either ‘Add field’ or Edit field’.
- This will only work if you have scanned a barcode already. See the list of barcodes that have been scanned and tap an item. Once you’ve tapped an item (it doesn’t matter which one), you‘ll see the ‘Edit item’ menu. Select either the ‘Add field’ or ‘Edit field’ option.
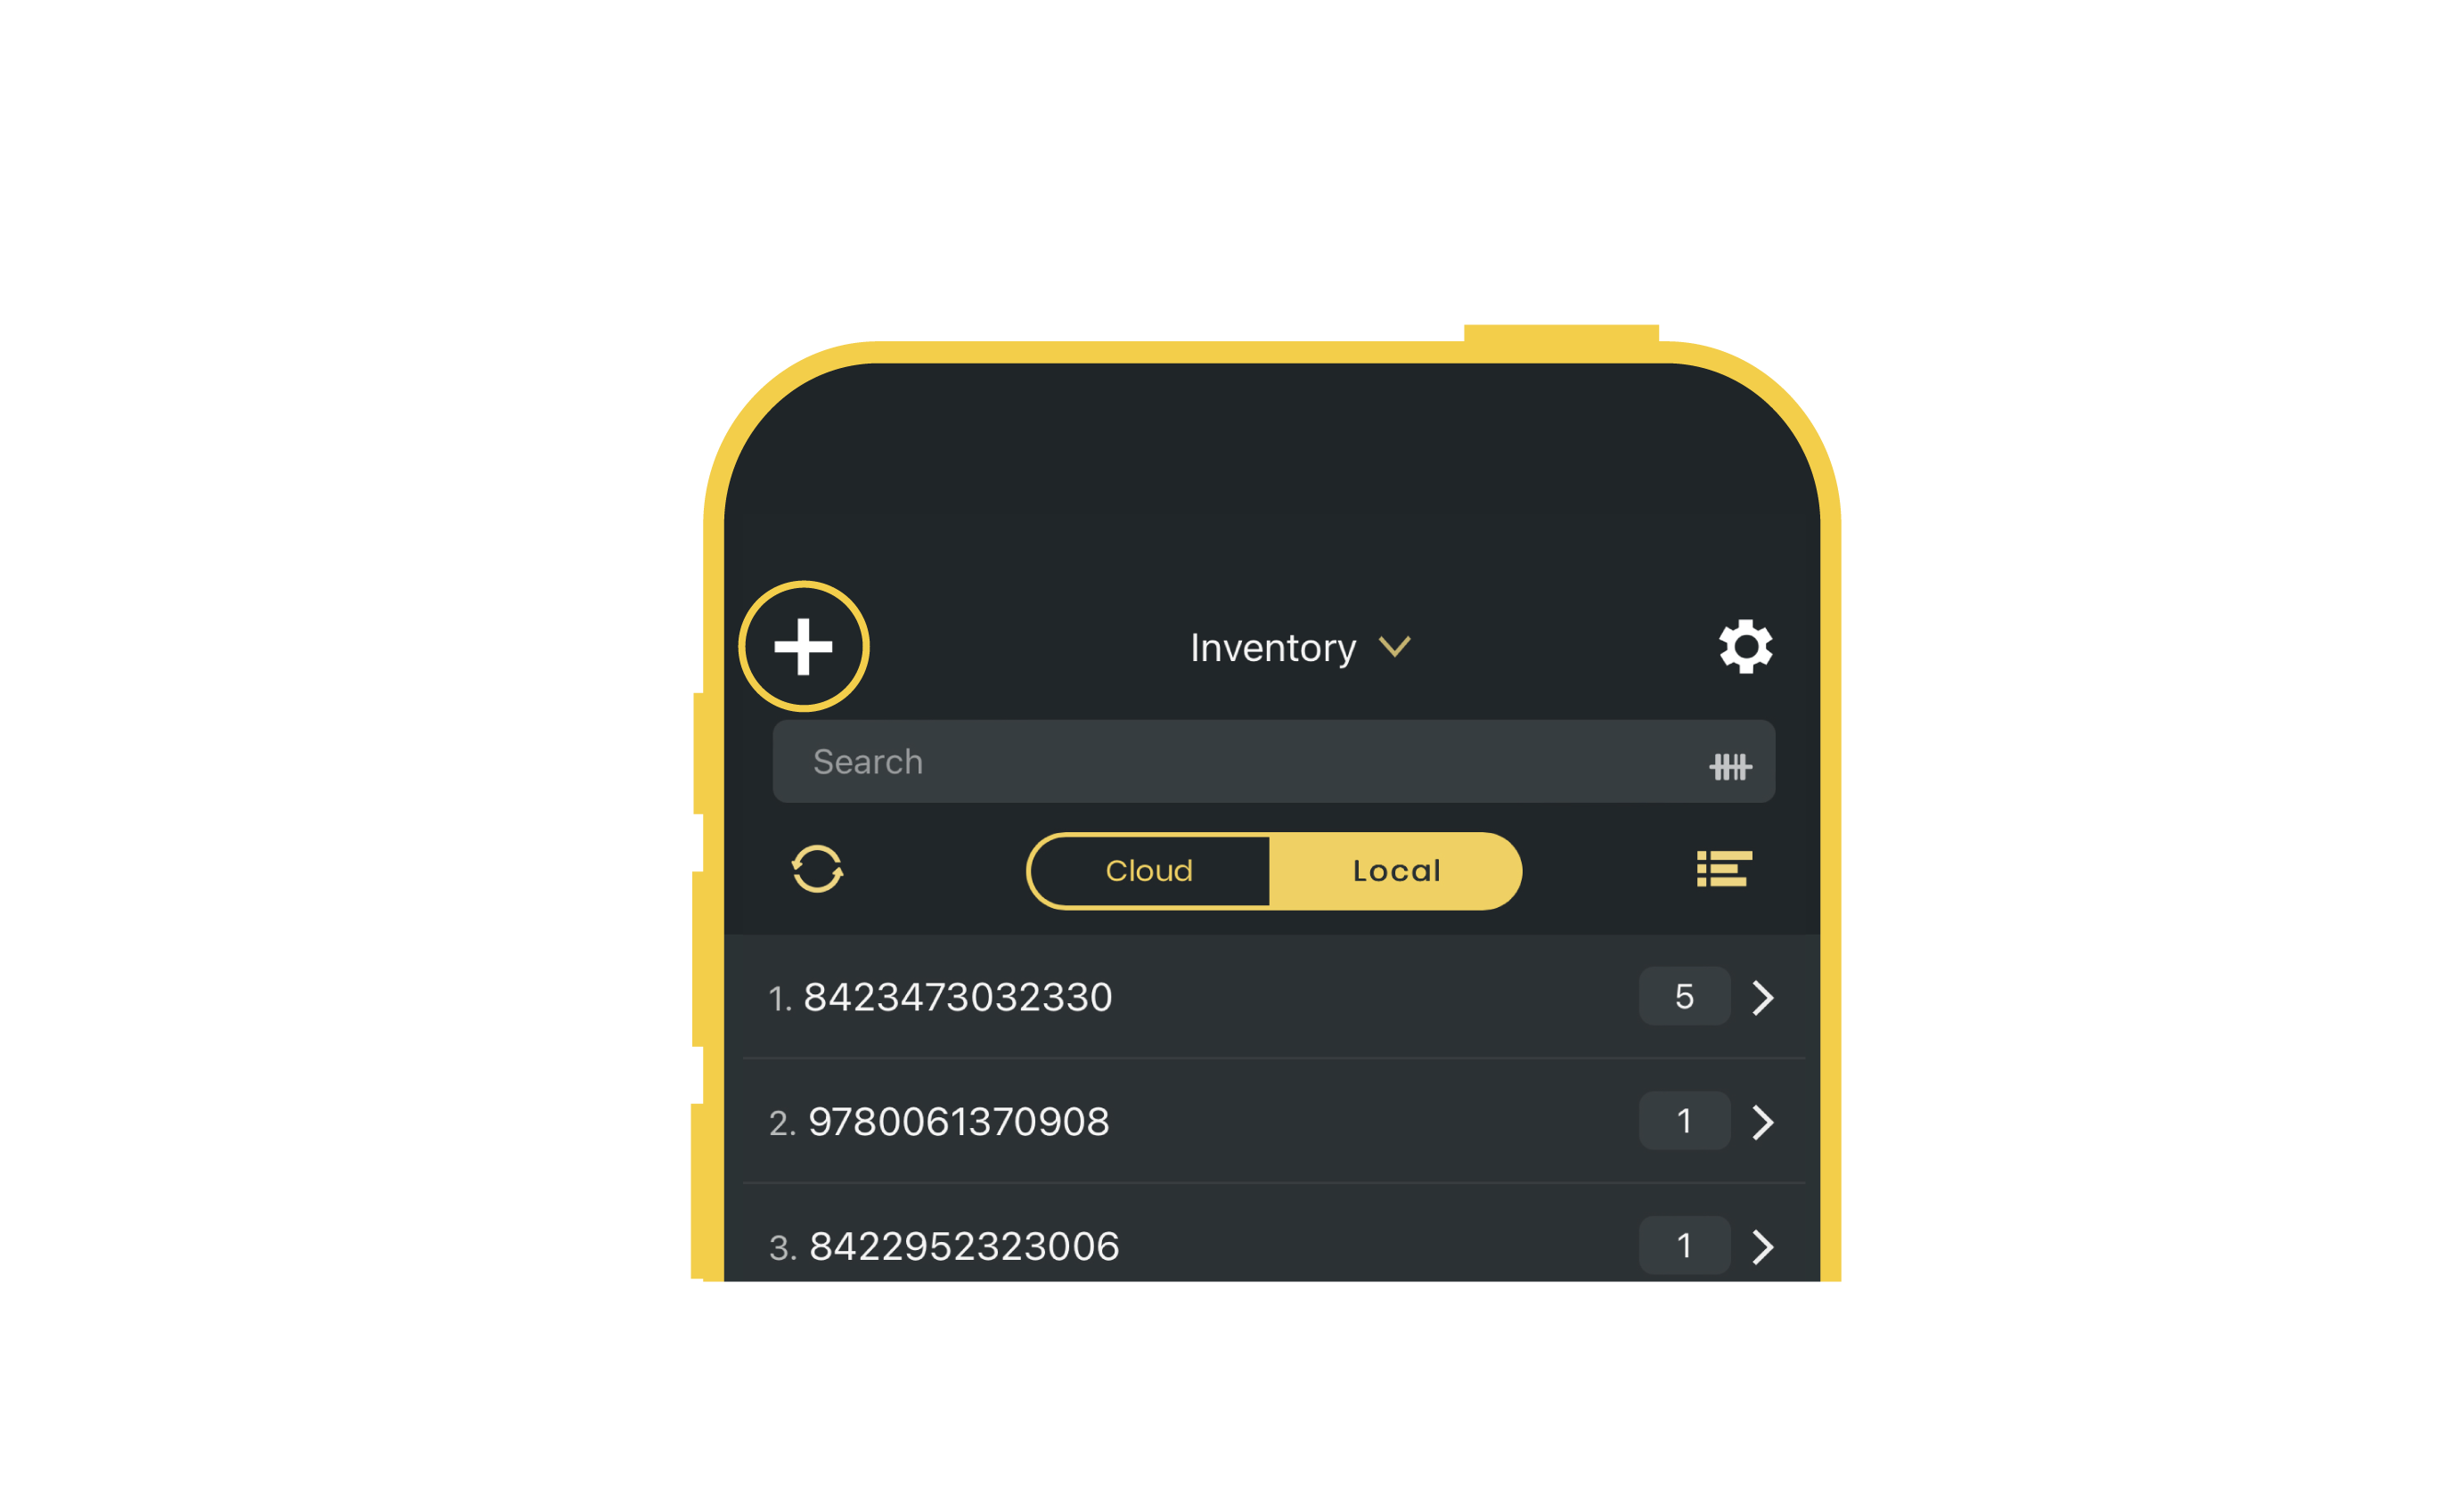
Searching data
As your barcode data grows in Orca Scan, you’ll need to search through it from time to time. To do this, simply tap the search bar at the top of the app and search for what you need.

Arranging data
Underneath the search bar, is a sorting icon; tap this to load up the ‘Sort by’ and ‘Group by’ options. You can either sort or group your data by whichever data field you have available in the sheet.
Clearing data
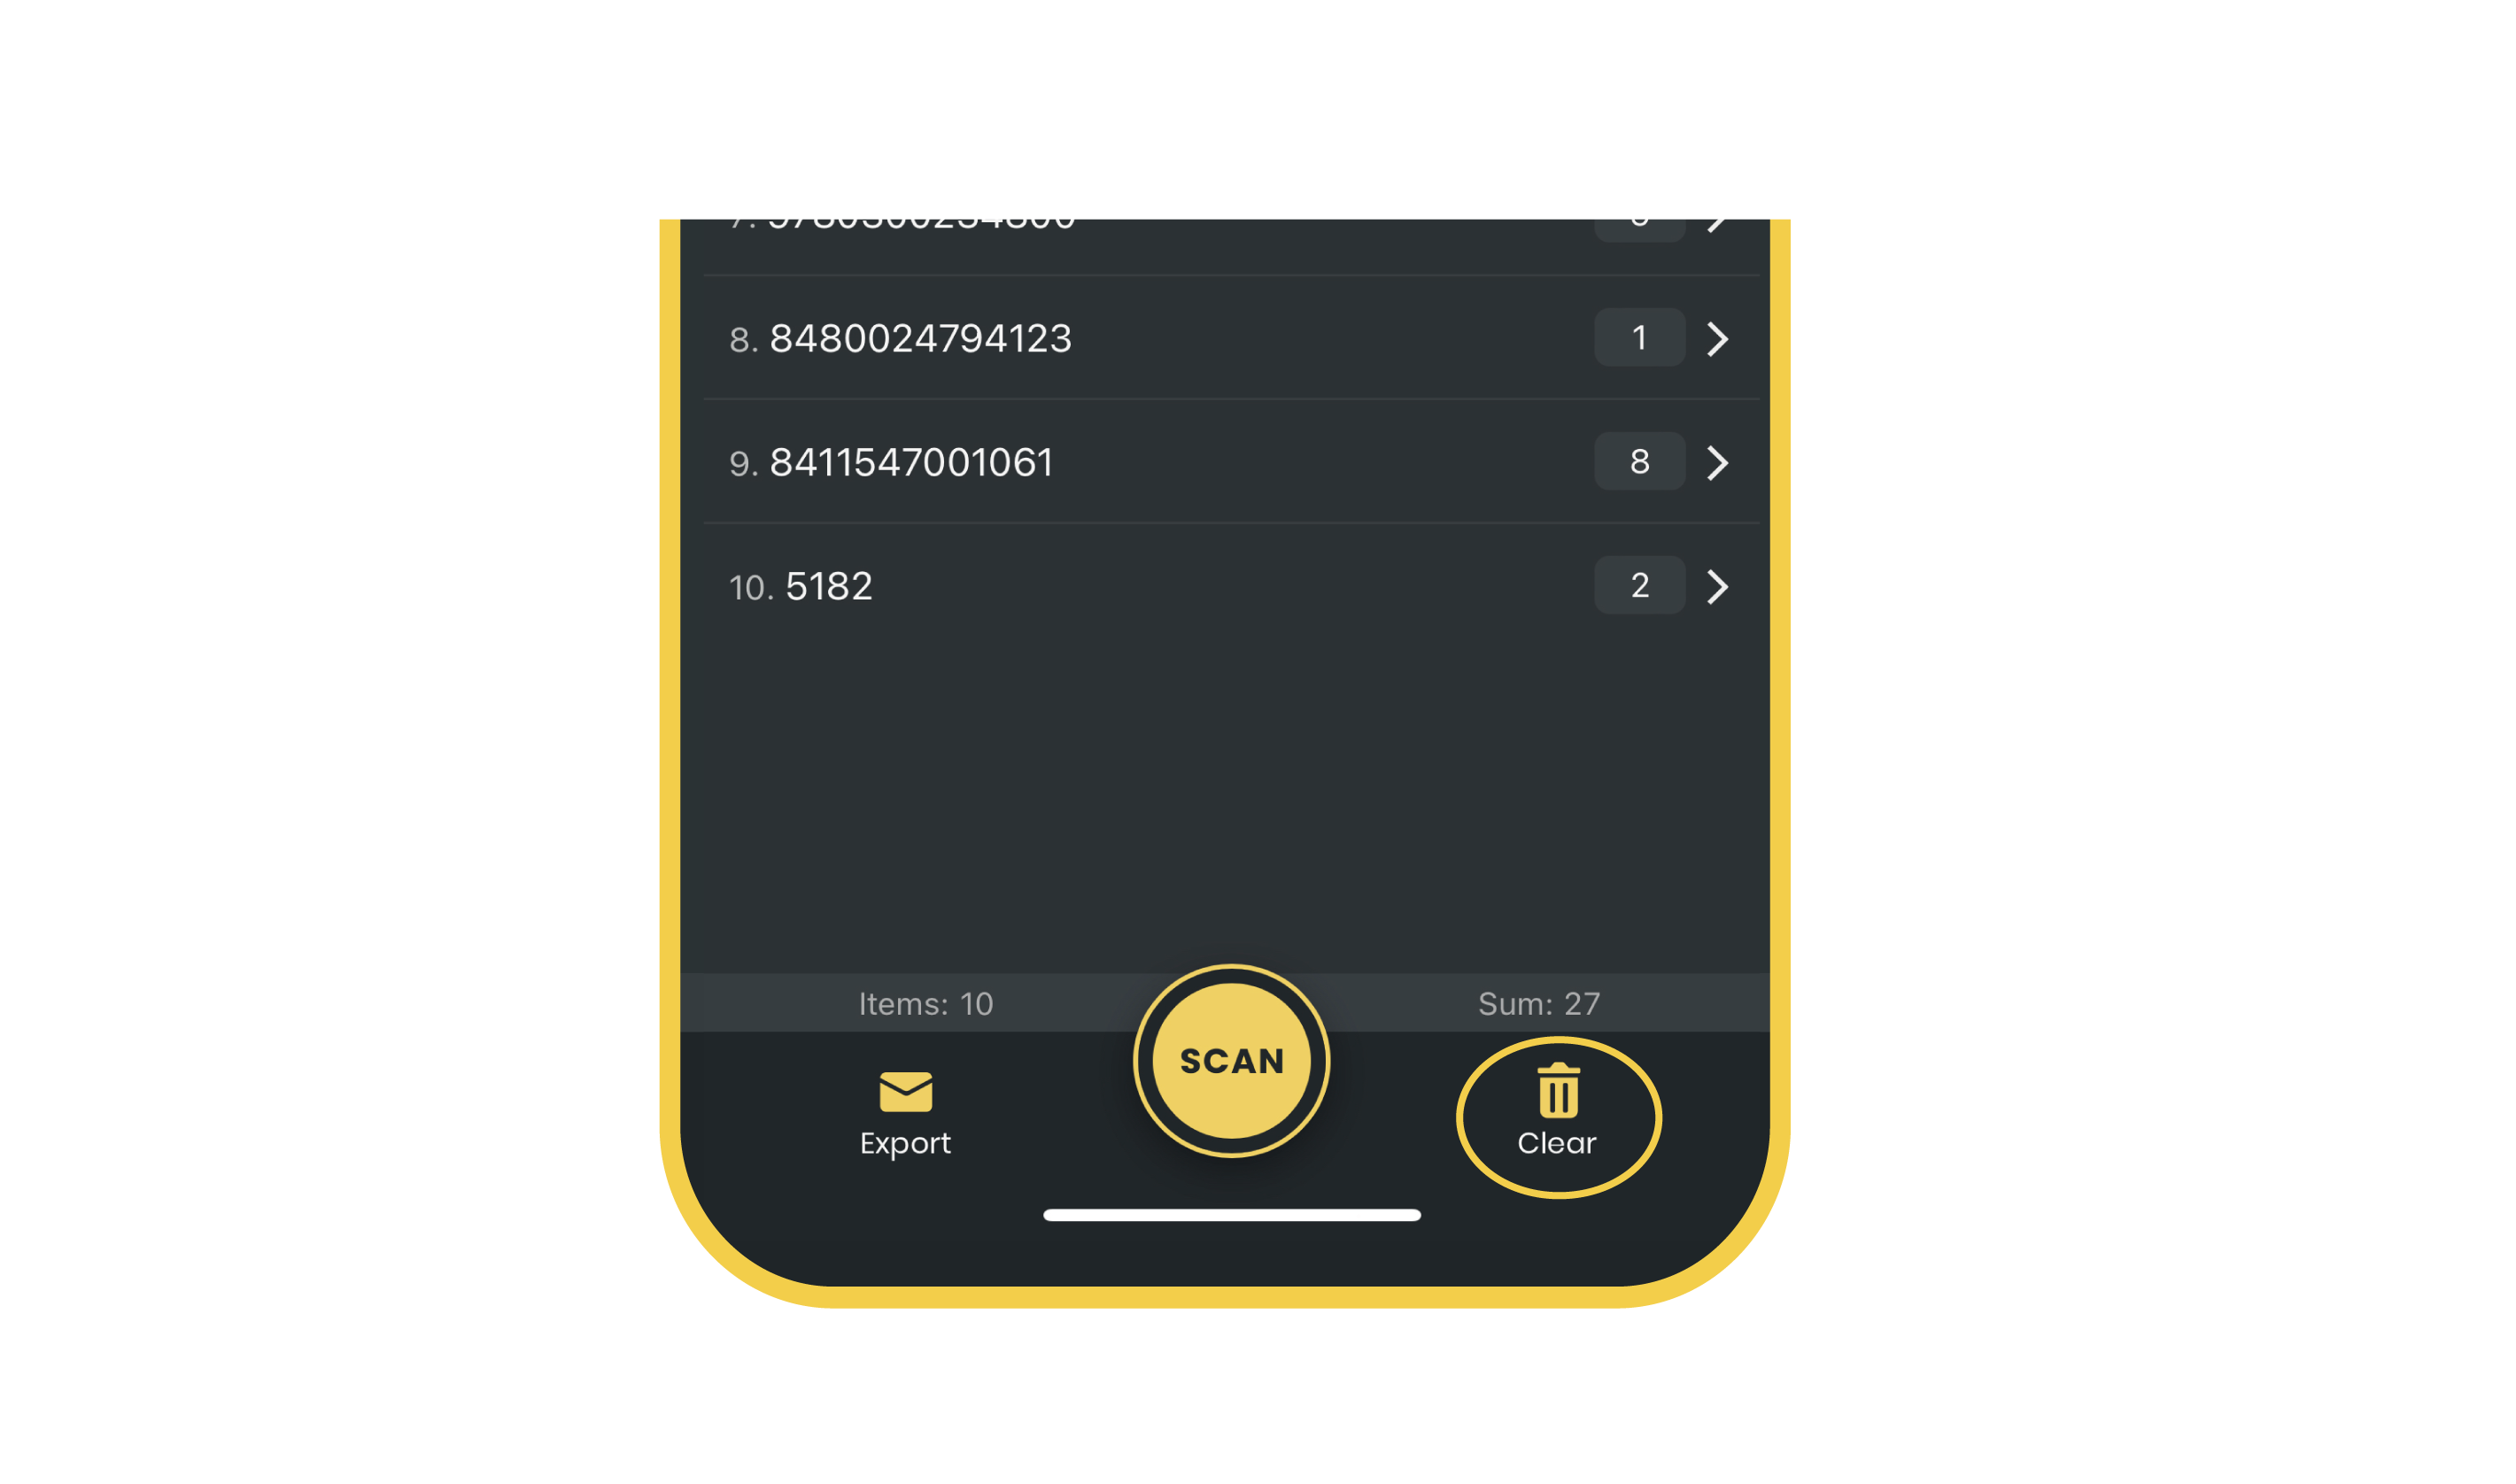
If you need to clear the sheet without deleting it and its data fields, simply hit the ‘Clear’ button in the bottom right of the app to load up two options; ‘Clear Quantities’ and ‘Clear Data’.
Adding users to a sheet
First, you need to bring up the sheet options by tapping the dropdown icon next to your sheet’s name (located towards the top of the app), then tap the ‘Add users’. To complete this step, you would need to log in to the Orca Scan web app and upgrade your account based on how many users you need.
Exporting your data
By hitting the export button on the bottom left of the app, you’ll be presented with options to send as an email, share via…, open as a file or print. Sending as an email or opening as a file gives you the flexibility to choose the file format (Excel, CSV, HTML, JSON or XML). Sending via an app of your choice will export the data as an Excel sheet, and printing will send your data ready to print.

Managing your settings
In the top right of the app, there’s a settings cog icon. By tapping this, you’ll be able to access the following:
- Switch between light and dark themes
- Switch between portrait and landscape screen rotation to lock
- Enable the add item details menu after each scan
- Enable continuous scan mode
- Enable both vibrate or beep on a scan
- Enable the front camera as the default
- Enable a PIN to modify settings
- Enable exporting of data
- Enable opening data as a file
- Enable clearing quantities
- Enable adding fields
- Enable editing fields
- Enable deleting fields
How do sheets work?
Orca Scan was designed around the concept of a spreadsheet, each sheet acts as a separate database with custom data entry fields you define. The data entry fields become columns in the exported spreadsheet.
The data is stored in the cloud, allowing hundreds of users to synchronise data between devices and optionally pull that data into the systems they love.
Working with the Web App
Completing some tasks may need you to use the Orca Scan Web app.
Head over to orcascan.com to:
- Import data
- Add users
- Create views
- Set up data sources
- Create Triggers
- Print a large number of barcodes
- View assets on a Map
- Set up an Integration to Google Sheets, Excel and more
- Build out custom workflows with many of your favourite apps with Zapier and Make (formerly Integromat)
- Connect to Power Bi, Tableau or Data Studio to build dashboards
- Connect to the API
To make it as easy as possible, we’ve created a range of guides on how to use our features and a clear guide on how to get started on the Web App.
Top Tips
1. Using continuous scan mode for bulk scanning
If you only need to capture the barcodes, you can save time by enabling the continuous scan mode, which automatically saves items and removes the need to tap save.
Find it under the settings panel of the mobile app.
2. Pinning values to repeat entries on scan
When scanning barcodes in batches (like locations or consignments) you should only enter the common value once and automatically repeat it on all the following scans.
Pinning a value to a field lets you do this.
To discover what else you can do using Orca Scan, or to find step-by-step directions on how to use some of our features, check out more of our guides.
Have a question about the Orca Scan mobile app?
We’re always happy to help; chat with us live or drop us an email.