You can use Triggers to add if-this-then-that logic to your sheets without code, to do things like:
Show and Hide Field Conditionally
Set Low on Stock Notifications
Receive Emails When an Item is Damaged
Split Barcode Data into Separate Fields
Use triggers to automatically split complex barcode data, such as GS1 or VCard, into different fields—eliminating the need for repetitive data entry. You can use triggers for a wide range of applications, including cannabis product tracking.
Each trigger is made up of:
- Condition = what must be true for the condition to be met
- Action = what should happen when the condition is met
1. Open the Triggers Menu
- Open your sheet: Navigate to the sheet where you want to add a trigger
- Access Triggers: Click on the Triggers icon located in the top-right corner of the sheet
- Add a Trigger: Click ‘Add’ from the triggers tab to begin the setup process
2. Name Your Trigger
Giving your trigger a clear, descriptive name is essential for easy identification and management
- Enter a descriptive name: Choose a name that reflects the purpose of the trigger
- Example: “Request damage details if the vehicle is damaged”.
3. Define a Trigger Condition
Conditions determine when a trigger should activate. You can set up basic conditions or explore more advanced options.
- Set the condition: Define the specific scenario that must occur for the trigger to activate
- Example: “Description contains ‘Damaged’”
Conditions
| Condition | Description |
|---|---|
| Is Empty | Field contains no value |
| Is Not Empty | Field contains any value |
| Contains | Field contains a particular set of characters |
| Does Not Contain | Field does not contain a particular set of characters |
| Starts With | Value starts with ‘x’ |
| Does Not Start With | Does not start with ‘x’ |
| Ends With | Ends with ‘x’ |
| Does Not End With | Does not end with ‘x’ |
| Equals | Field contains the exact value |
| Does Not Equal | Field does not contain the specified value |
| Is Less Than | Value is less than number provided |
| Is Greater Than | Value is more than number provided |
| Matches Regex | Field value matches a Regular Expression |
| Does Not Match Regex | Field value does not match a Regular Expression |
| Contains GS1 AI | Field value contains a GS1 Application Identifier |
| Exists In | Barcode exists in lookup, sheet or data source |
| Does Not Exist In | Barcode does not exist in lookup, sheet or data source |
4. Set a trigger action
A trigger action is what you want to happen when the defined condition is met.
- Chose an action: Specify the action that should taken when the condition is met
- Example: Update a field, send a notification, or apply a rule.
Actions
| Action | Description |
|---|---|
| Show | Show the selected field when trigger criteria is met |
| Hide | Hide the selected field when trigger criteria is met |
| Set Value | Apply custom value to selected field when trigger criteria is met |
| Clear Value | Clear the value of the selected fields when trigger criteria is met |
| Set Readonly | Users are unable to edit the value |
| Clear Readonly | Users can edit the value |
| Notify Me | Notify the user via email, in-app notification, or dialog. |
| Play Sound | Play a success, warning or error sound |
| Move Row | Move or update a row in a selected sheet when criteria is met |
| Copy Row | Copy or update a row in a selected sheet when criteria is met |
5. Save the changes
- Save the trigger: Click Save to confirm and apply your settings.
- Test the trigger: Test the trigger by scanning a barcode or entering data to see if it activates as intended.
Advanced Condition Options
For more complex scenarios, you can use advanced conditions like Regular Expressions (RegEx) or GS1 Application Identifiers (AI):
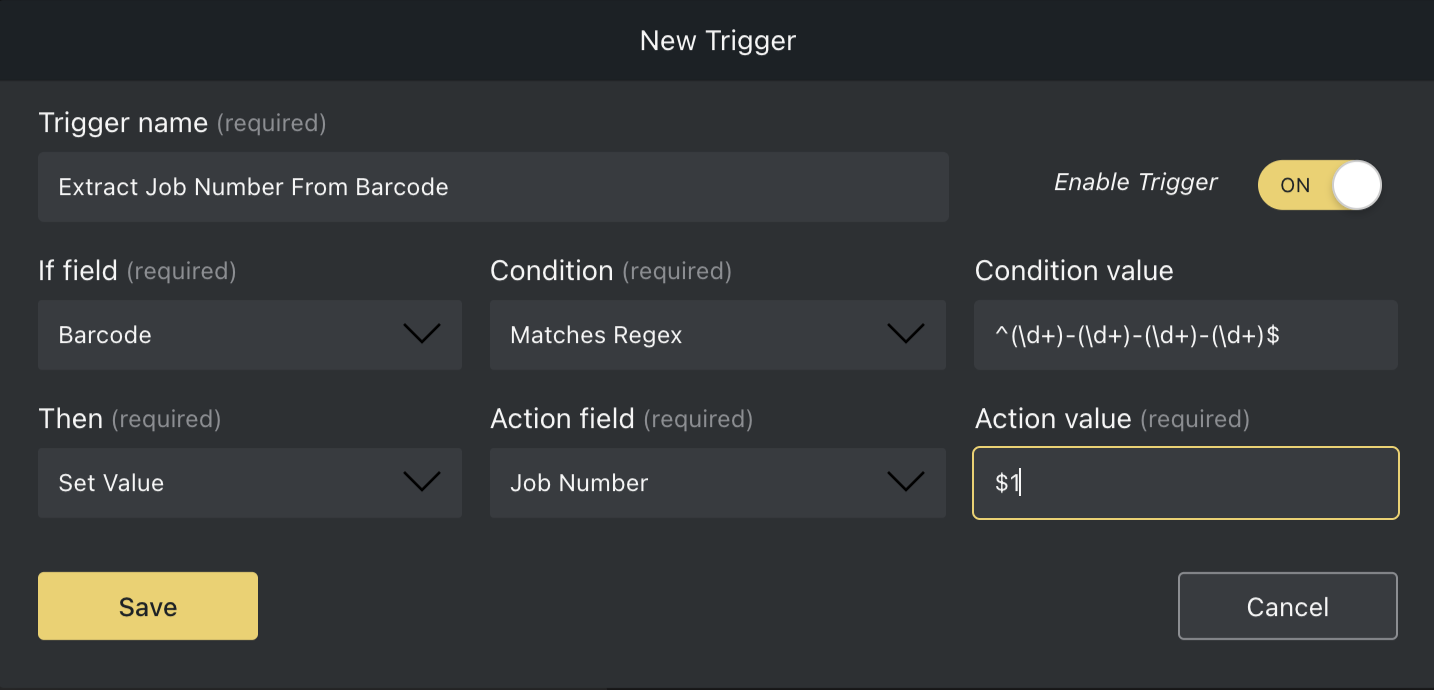
Matches RegEx
Regular Expressions (RegEx) are powerful tools for detecting specific patterns in text. In addition to validation, they can be used to extract, split, or reformat data with the Set value action.
Example
Given the RegEx pattern (\\d+)-(\\d+)-(\\d+)-(/d+)$ you can match and extract groups of digits separated by hyphens.
Using the following as input:
**12345-67890-54321-98765**
You can reference these matched groups as $1 , $2 , etc., to extract specific parts of the string.
- First Group:
$1→ Output: 12345 - Second Group:
$2→ Output: 67890 - Third Group:
$3→ Output: 54321 - Fourth Group:
$4→ Output: 98765
We love Regular Expressions, but they can be tricky, RegEx 101 is a great tool to use when writing and testing your expressions. If you need step-by-step guidance, RegexOne offers fantastic tutorials. Need a hand? Don’t hesitate to reach out to us!
Contains GS1 AI
GS1 (also known as Global Standards 1) is an international standards organisation that has set a series of standards for how information is encoded within a barcode.
These globally adopted standards help computer systems around the world make sense of physical objects as they move through the supply chain.
The Contains GS1 AI condition can be used to perform an action when a barcode contains a specific GS1 Application Identifier.
When used in conjunction with the Set value action, values such as serial number, expiry date etc can be extracted from a GS1 barcode and moved into a relevant field/column.
How to Set Up Low Stock Notifications
Set up a low stock level for each specific Item:
- Create a minimum stock column
- Add a new column Min Stock, and assign it a Data type of Number
- Ensure to Save
- Enter the minimum stock levels for each Item
- Add a trigger using the following:
- If field - Quantity
- Condition - Is Less Than
- Condition Value - [Min Stock] (Use exact column name inside squared brackets [] )
- Then - Notify me
- Notify Via - Select a notification method
That’s it. Whenever a product quantity falls below the Min Stock level, you will receive an email notification with related product information.
How to Set Up Expiration Notifications for Scanned Products
Set up an expiry date for each product:
- Create an expiry date column
- Add a new column Expiry Date, and assign it a Data type of Date
- Ensure to Save
- Enter the expiry date for each item
- Add a trigger using the following:
- If field - Expiry Date
- Condition - Is Less Than
- Condition Value - $DATE:NOW
- Then - Notify me
- Notify Via - Select a notification method
Now, whenever you scan a barcode for a product that has expired, you will receive an immediate notification with the relevant product details.
Questions about triggers?
We’re always happy to help; chat with us live or drop us an email.
