
You can create a real-time link between an Orca Scan sheet and a Google Sheet from the web application. Scanned barcodes and data entered from the mobile app will be pushed automatically into your Google Sheets.
Scan barcodes into Google Sheets
If you’ve not done so already, log in to your online Orca Scan account and create a sheet. Once you’ve done that, use the following steps to connect your sheet.
- Get the export link from your Orca sheet
- Add the
IMPORTDATAformula - Paste the export link
1. Open the Integrations menu
Start by navigating to the integrations settings on the sheet you want to export from

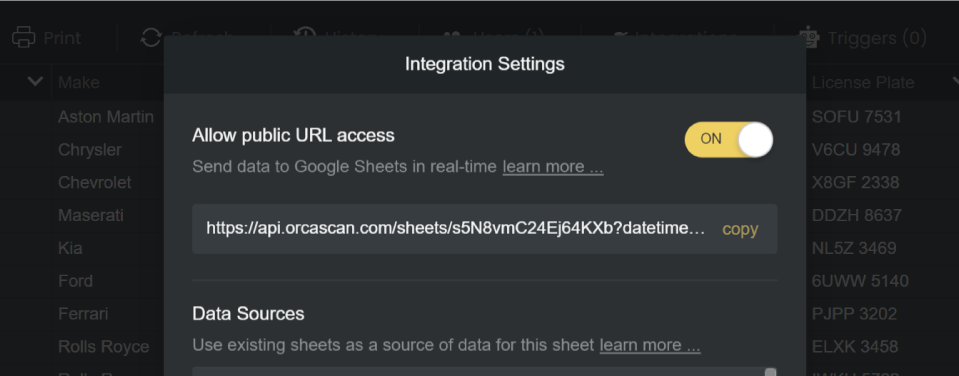
2. Enable Allow Public URL access
Allow the Public URL access to activate the link and copy it to the clipboard
3. Save the changes
Finally, save the updates on the integrations settings to put all your changes to work

Now, let’s head over to Google Sheets…
4. Add an Import Formula to your Google Sheet
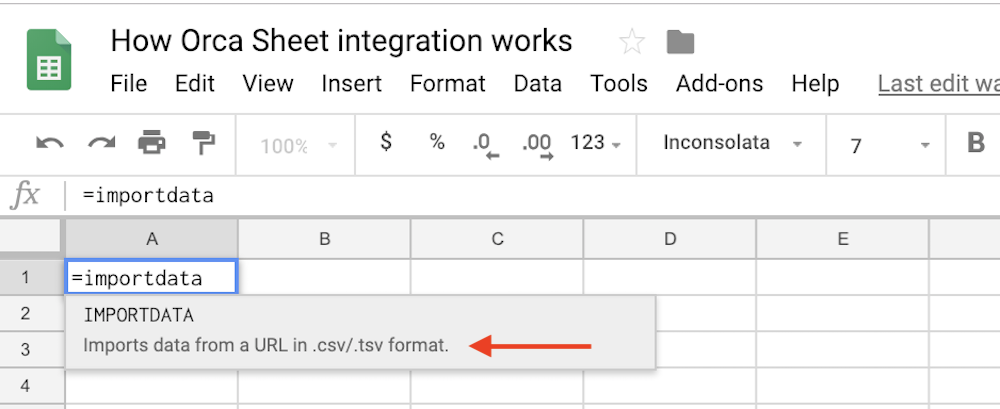
Place the cursor in the A1 cell and add the =IMPORTDATA formula to the first cell of your sheet
5. Enter the Live Data URL link
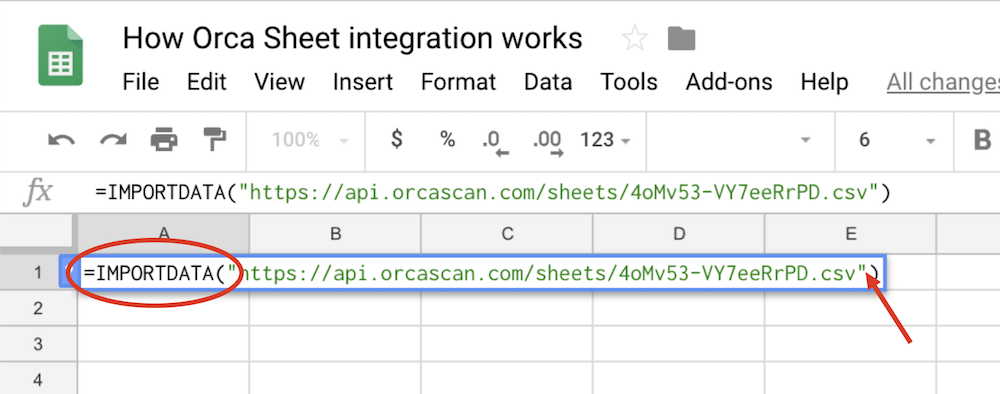
Now add the export link from Orca Scan within the brackets =IMPORTDATA("replace-with-your-orca-sheet-url-here.csv") - be sure to include the quotation marks!
6. Load the data
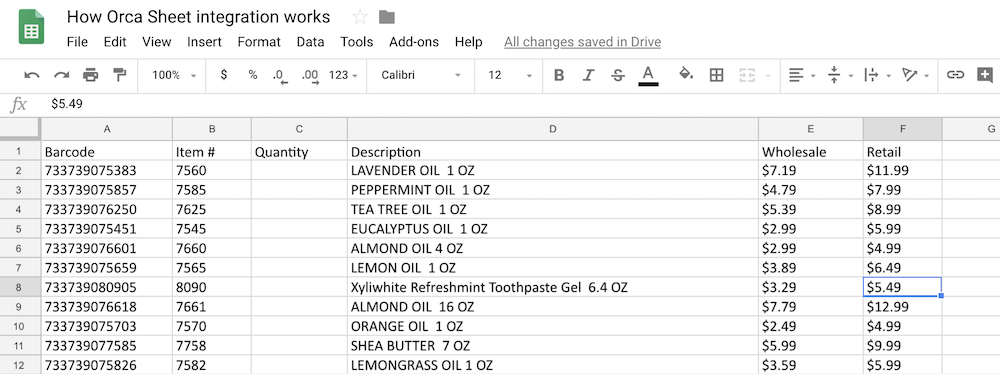
Finally, press enter and wait for your Orca data to load in Google Sheets:
URL export configurations
You can tweak the data export by appending parameters to the URL for example:
| URL parameter | Description |
|---|---|
sortby=barcode&sortorder=desc |
Sort output by column |
.html / .csv / .json / .xml |
Change output format |
transactions=true |
Include audit trail |
deltas=true |
Include deltas for numeric columns |
datetimeformat=DD/MM/YYYY |
Change date format |
timezone=-03:00 |
Change time zone |
Important: Always use a ? before the first parameter and an & before each additional parameter, for example: https://api.orcascan.com/sheets/sJ0KYsnp-9b7Rl7i?transactions=true&deltas=true
That’s it!
You’re done. Your Google Sheet will now reflect all the information in your Orca Sheet. So, if you add, update or delete a row inside Orca Scan, Google will automatically pull the changes into your Google Sheet.
Important:
- Google pulls data from your Orca Scan every 60 minutes
- Clearing your Orca Sheet will clear data from your Google Sheet
How to update Orca Scan from Google Sheets
To create a complete two-way sync between Orca Scan and Google Sheets, we need to introduce a third-party tool called Zapier, which is a no-code connection to create a real-time link between Orca Scan and a Google Sheets sheet and can be utilised to build limitless workflows between your apps.
Before you start
Log in or create an account with Zapier and head to the dashboard and create a zap. Once done, use the following steps:
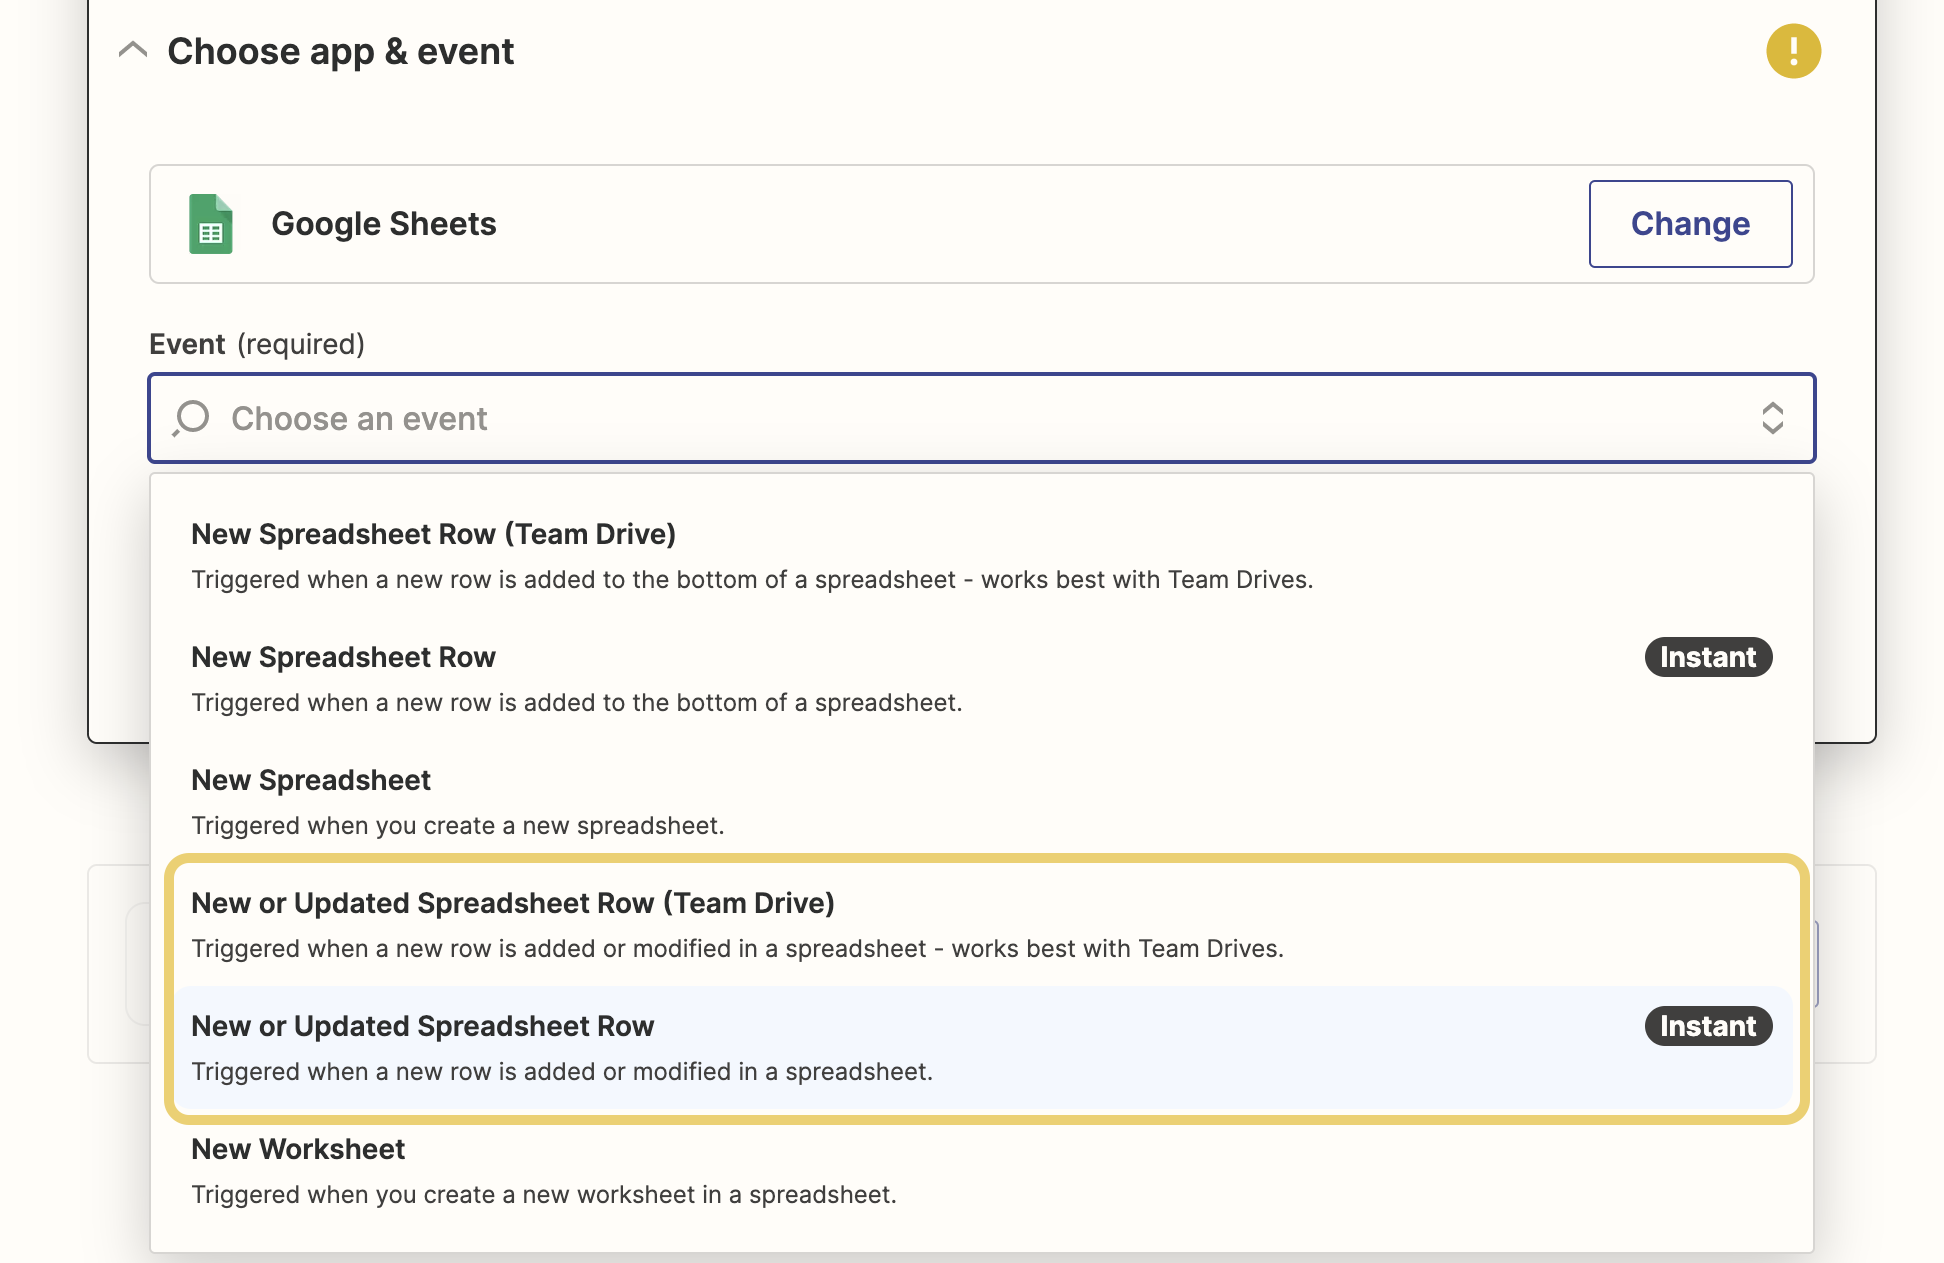
- Select the Google Sheets app as the trigger with the ‘New or Updated Spreadsheet Row’ event selected
- Find the spreadsheet and worksheet you want to send data from and select the column you want to listen to, leave as any_column to listen to all events
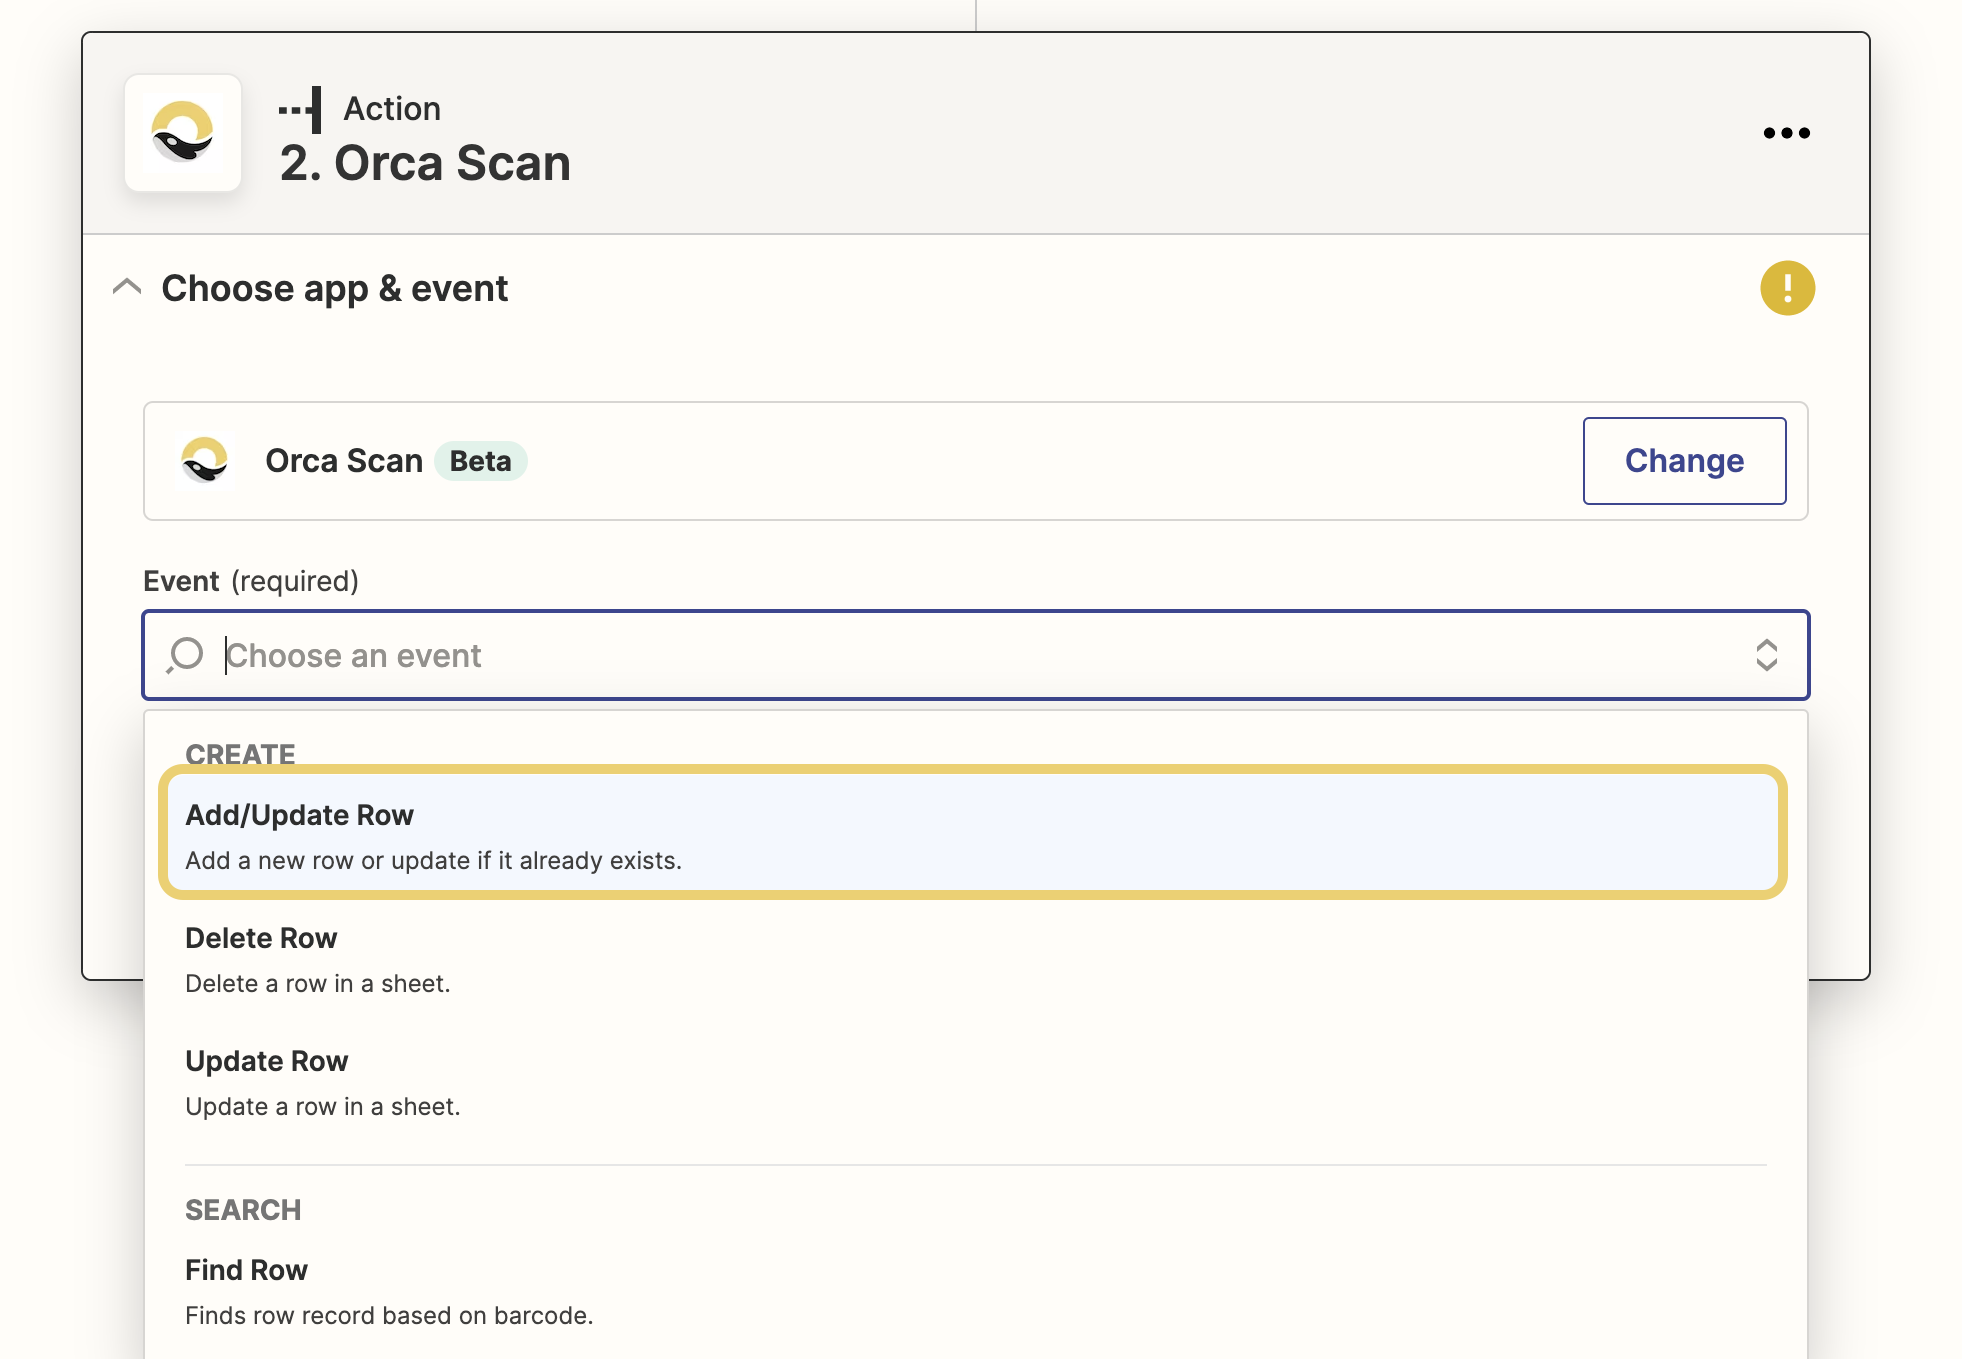
- Select the Orca Scan app as the action with the ‘Add/Update Row’ event selected and find the sheet you want to send data to
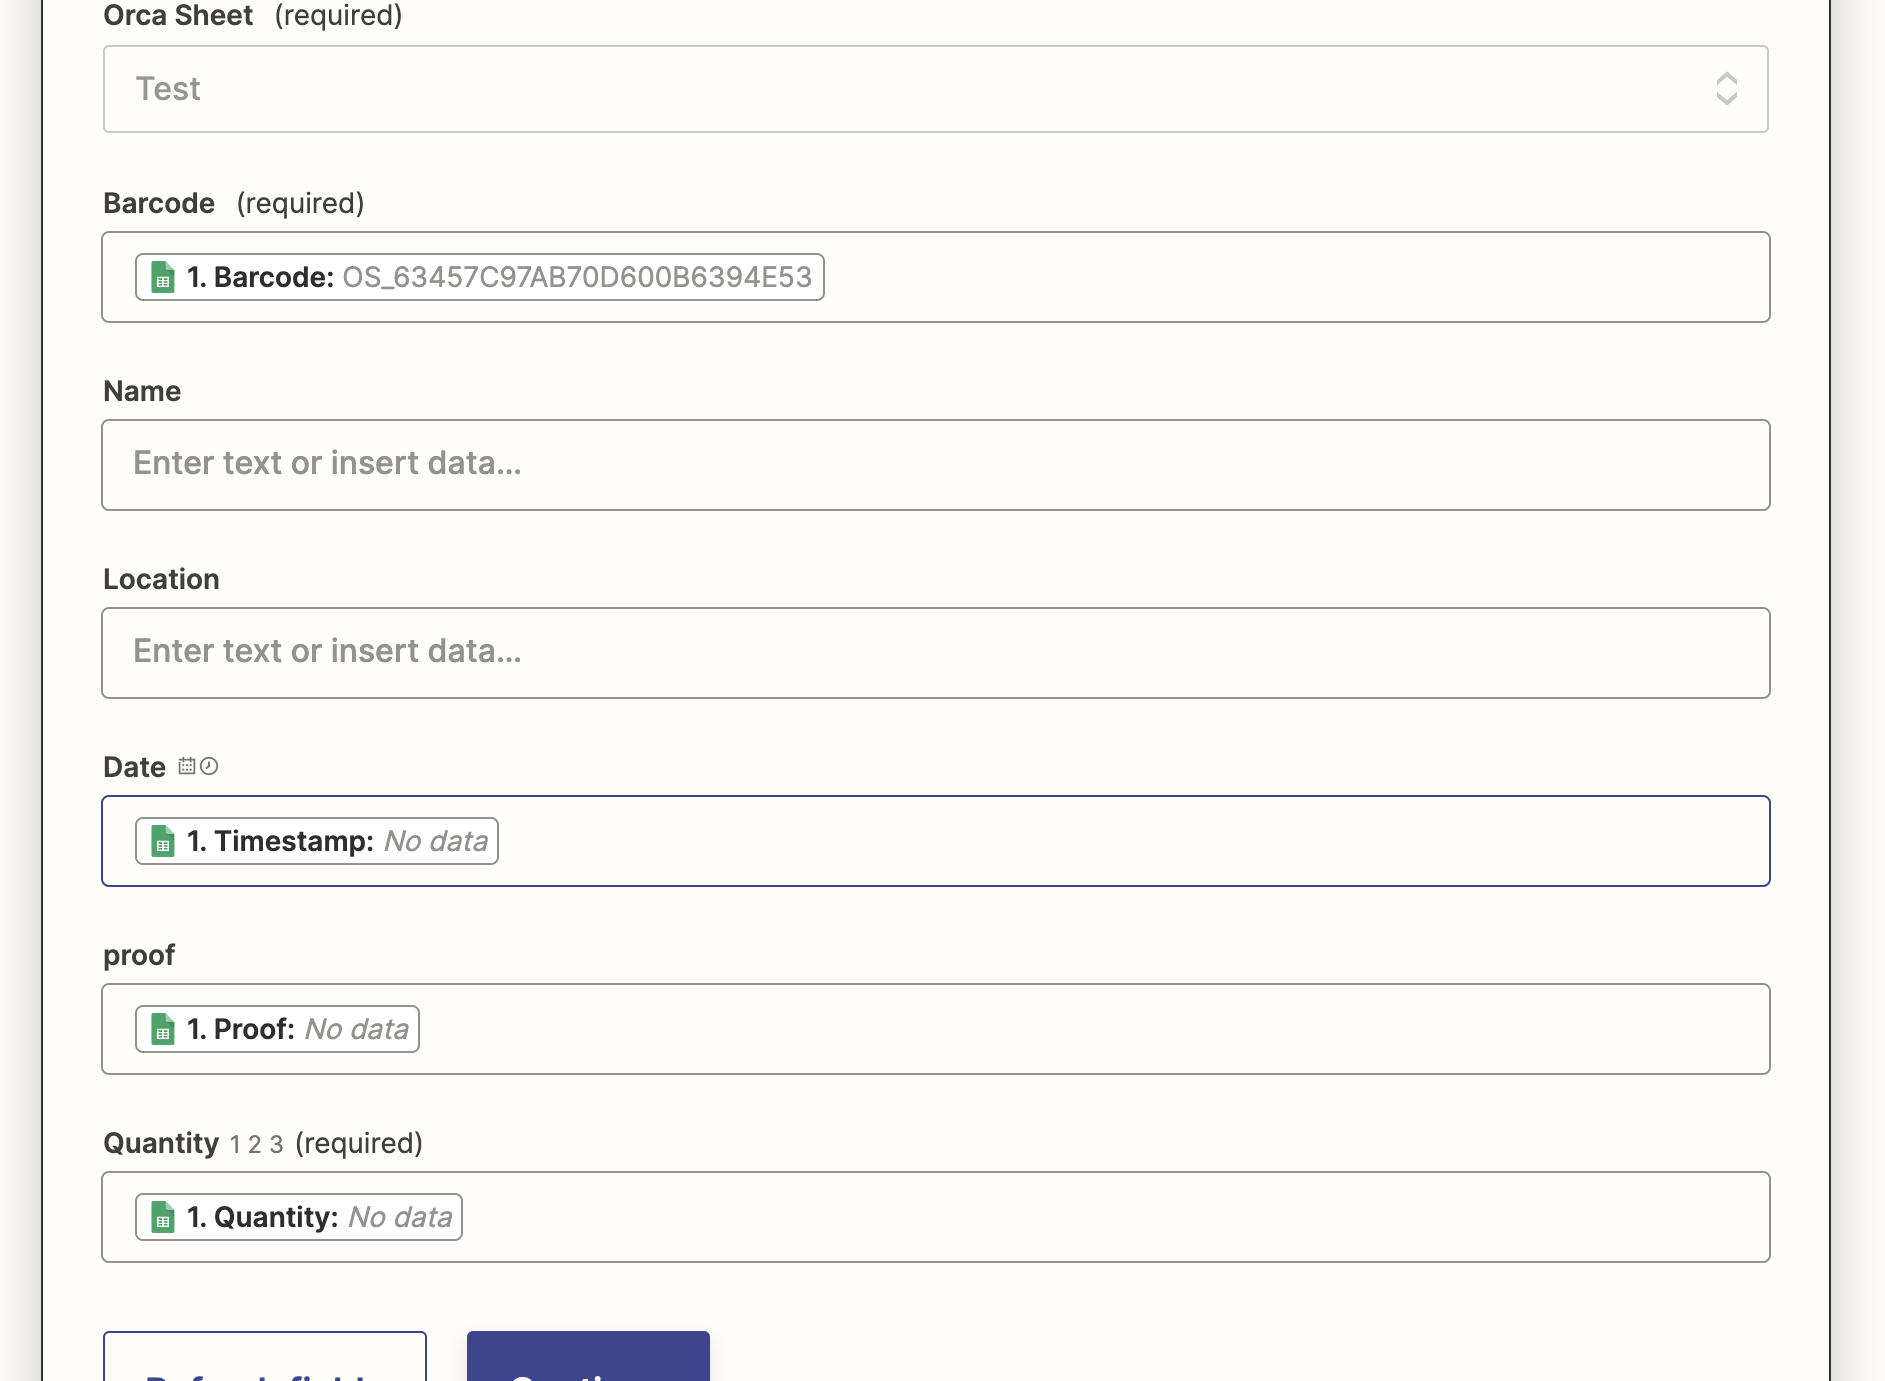
- Map out which Orca Scan data fields will be updated and with which Google Sheets data (only use the ones you want to update)
Please see our walkthrough guide on how to add Orca Scan into Zapier as a trigger or as an action. For further help and troubleshooting, check out Zapier’s help centre.
1. Set up Google Sheets as a Zapier trigger
Log in to Zapier and start by hitting the ‘Create Zap’ button on the sidebar of the dashboard. This will take you straight to the Zap editor, where you’ll set up the trigger events

Search for the Google Sheets app, select it and sign in to your Google account when asked. Then find the event drop-down menu to select ‘New or Updated Spreadsheet Row’ (if the sheet you want to connect with Orca Scan lives in a Team Drive then select ‘New or Updated Spreadsheet Row (Team Drive)’
2. Select the trigger column
Find the spreadsheet and worksheet within that spreadsheet you wish to connect and select them. Then set the trigger column to ‘any_column’ to trigger when any update is made, regardless of the column, or if you want the zap to trigger only when a specific column has changed, then choose the respective column in the dropdown list
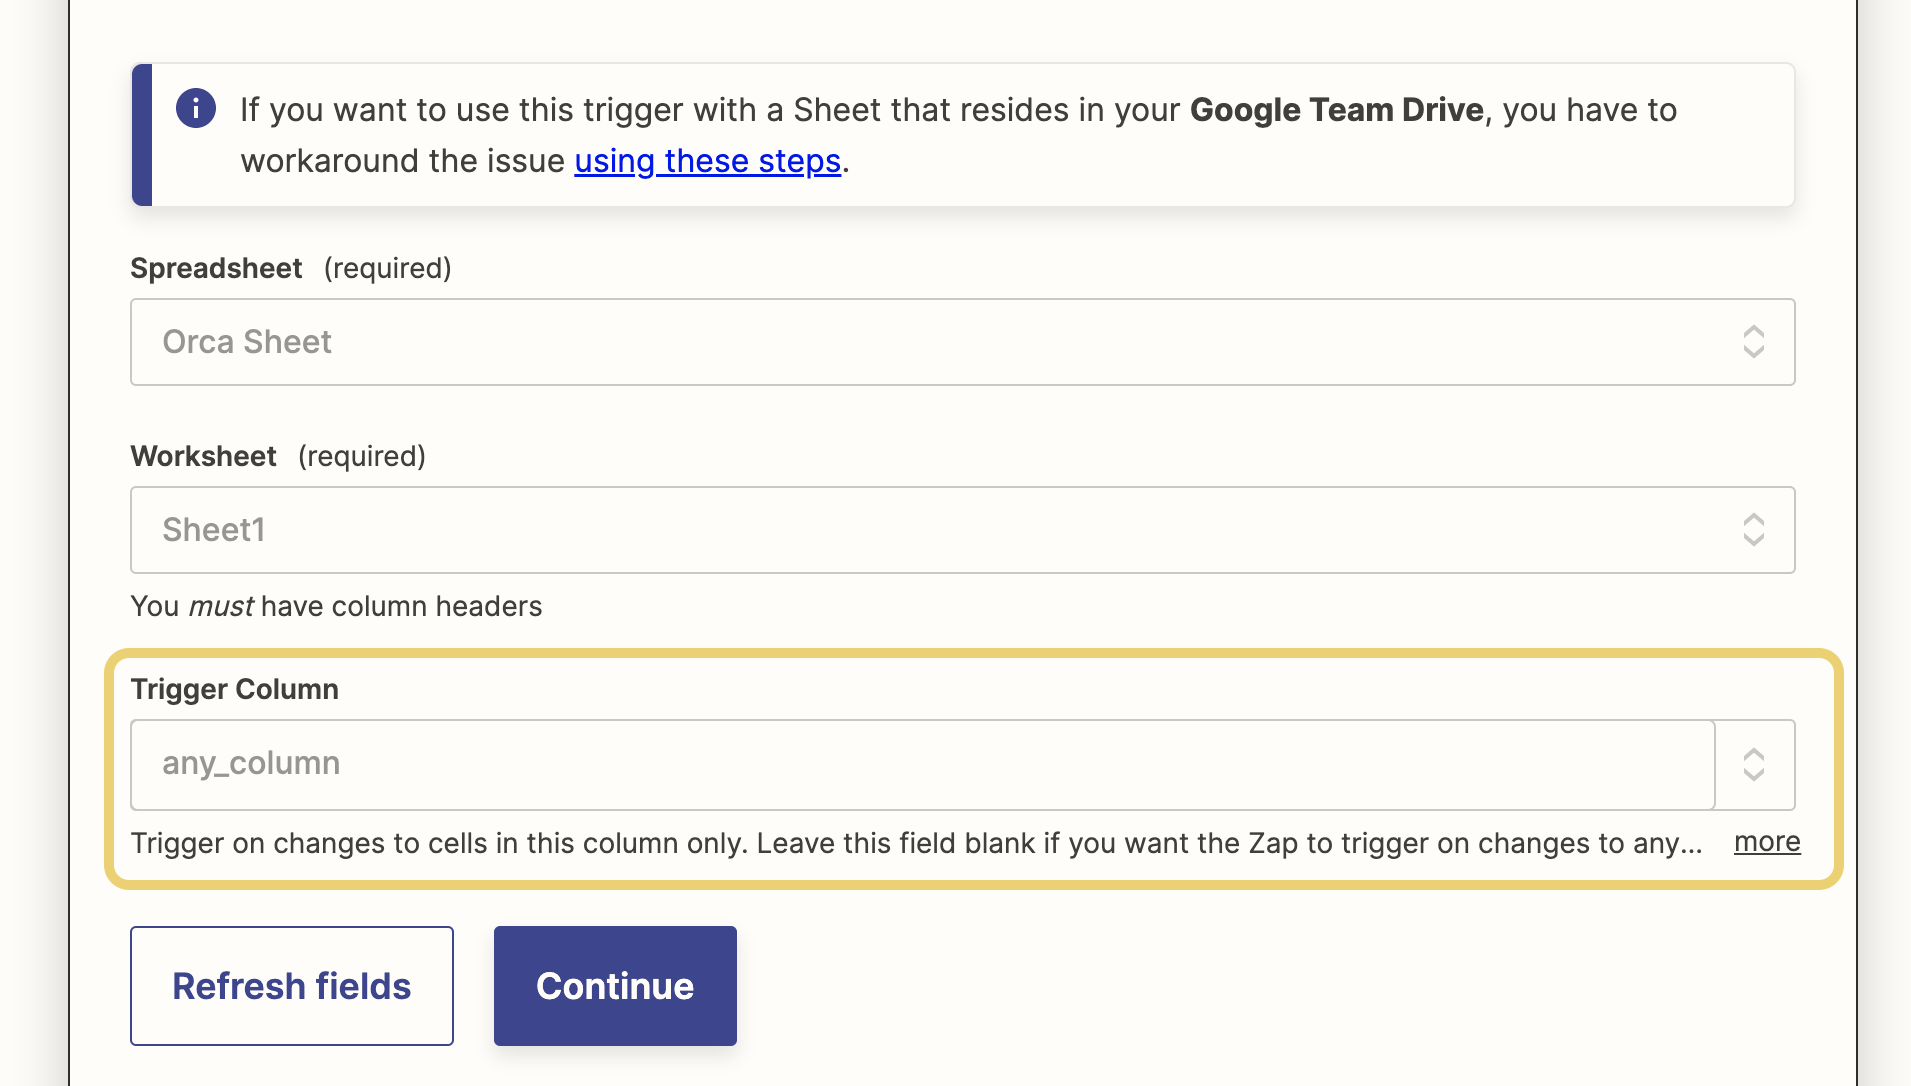
Now, head to the next step to test the zap trigger to pull through the most recent data.
3. Set up your Orca Sheet to make an action
Search for the Orca Scan app and select it. Then, you’ll find the action drop-down menu and select the ‘Add/Update Row’ option. This means that when a row in Google Sheets is added or modified, it’ll mirror the action inside your Orca Scan sheet
To progress forward, sign in to your Orca Scan account and enter your Orca Scan API key (you can find this by signing into the web app, hitting the drop-down menu in the top right corner and heading over to ‘Account Settings ’). Then, find and select the Orca Scan sheet you wish to connect in the first drop-down
4. Map the data fields
The fields that have loaded correlate to each column in your Orca Scan sheet. Here, you will need to select which data (coming from your Google Sheets worksheet) will be sent to a specific column in Orca Scan, so ensure they hold the same data as each other (if you don’t want to update a specific field, just leave it blank).
For this action to work and perform a lookup, ensure that the barcode column in Google Sheets represents the barcode column in Orca Scan
Done!
Now you have an action that’s ready to test. Once tested and works as expected, just make the Zap live and you’re ready to go!
Pro tip: On a Zapier paid plan, you have the functionality to build Multi-step zaps. This means that you can build a chain of multiple actions through several apps and even introduce complex conditions and branching logic to manipulate the data any way you like.
Questions about scanning barcodes into Google Sheets?
We’re always happy to help, chat with us live or drop us an email.
Request an integration
Need help getting Orca Scan working with your software? Request a Software Integration
