The Orca Scan Web App is your inventory HQ. It’s the place for you to configure and develop your barcoding solution and deploy it within your organisation in minutes.
The Basics
Once you’ve registered for an account, you will be asked to create your first sheet. Think of a sheet as a totally separate database with its own uniquely defined fields.
Ok, let’s jump straight in:
- Log in to your newly created account at cloud.orcascan.com
- Create a new sheet using a template, or start fresh with a blank canvas
- Download the Orca Scan mobile app from the iOS or Android app store
- Log in to your account using the Orca Scan mobile app
- Scan a barcode, then hit refresh in the Orca Scan web app
Great! Now you’ve got the basics figured out. Let’s explore your workspace to uncover all the features and how to use them.
Only in the web app
You can only sign up and pay for an Orca Scan subscription at orcascan.com, along with adding users to sheets (including setting permissions), importing data and accessing integrations, triggers and history logs.
Creating new sheets
A sheet essentially works as a database, visually represented as a spreadsheet with columns and rows. You should have already set up your first sheet. To add more, simply head to the bottom left and look for the + button, where you can add a new sheet (similar to Google Sheets and Microsoft Excel) or merge any of your current sheets into one view.
Learn more about the templates available for you to use in Orca Scan.
How to Design, Generate, and Print Barcodes
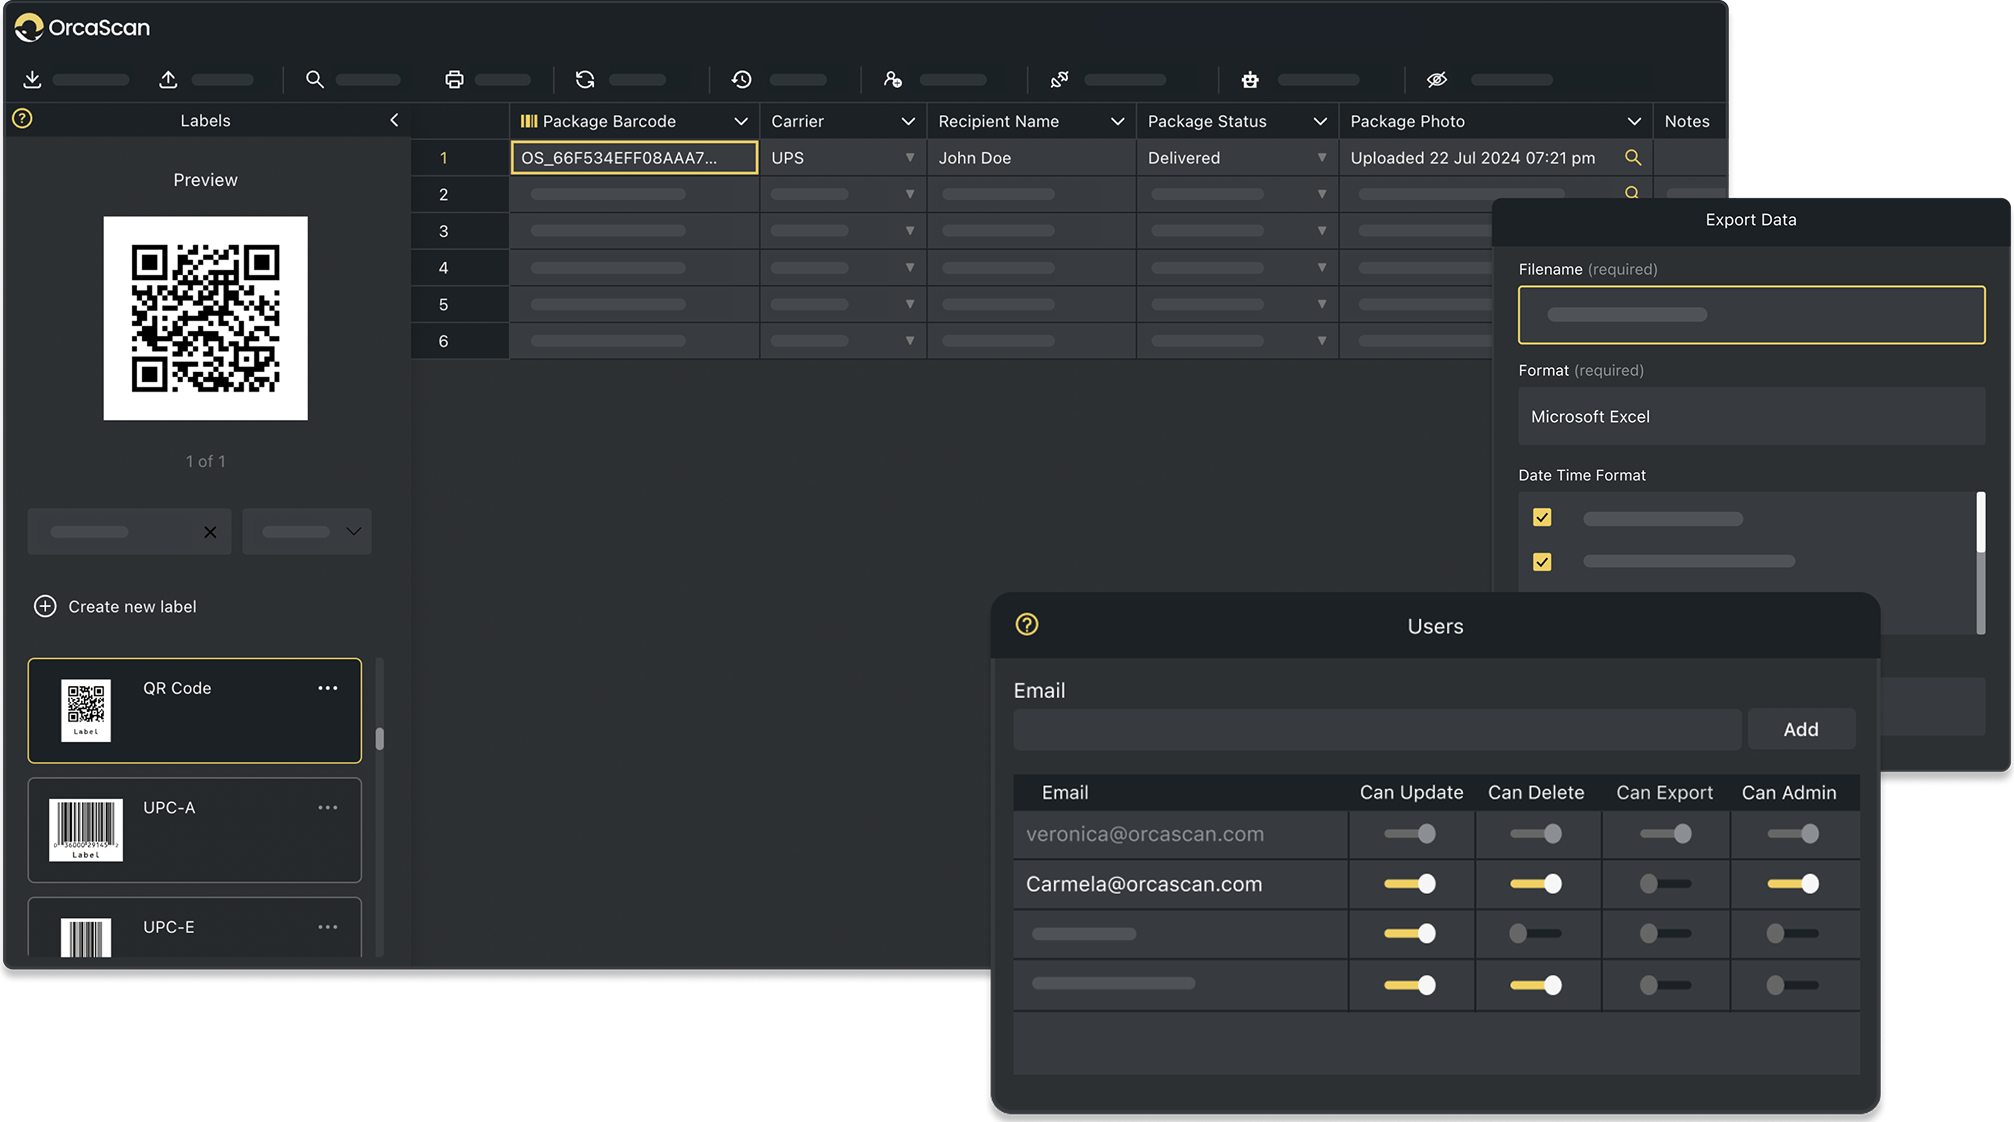
To design, generate and print barcodes, open the Barcode Labels sidebar on the left. You can choose which data you want to create a barcode for, and the type of barcode you wish to generate and print.
Generating Barcodes
- Automatically: Enter a value into another column, and Orca Scan will generate a barcode automatically in the Barcode column
- Manually: Add a specific value directly into the Barcode column to create a custom barcode
Printing Barcodes
Once your barcodes are set up, you can easily print them directly from Orca Scan using the print options available in the Barcode Labels sidebar.
For more info, read our guide on how to design and print barcodes.
Previewing the Orca Scan mobile app
To visualise what the Orca Scan mobile app will look like, open the Mobile Preview sidebar on the right.
Learn more about the Orca Scan mobile app.
Importing Data
Orca Scan makes it easy to import essential information about your products that are stored in other spreadsheets, so you have all your barcode information related to assets and inventory in one place.
To start importing, click the Import option in the toolbar above your sheet.
Learn more about how to import data into Orca Scan.
Exporting data
The barcode data within Orca Scan is super-easy to work with and plays well with other tools that you may use. By heading towards the top of your sheet, you’ll find the Export option in the toolbar where you can export your barcode data as Microsoft Excel files, CSV files, JSON files, HTML files, XML files and ACCEO Retail-1 files.
Customising your data fields
Each column in your sheet is an input field within your Orca Scan mobile app. To add, edit, clear, delete, move and sort columns, simply right-click on any column inside your sheet to show the options.
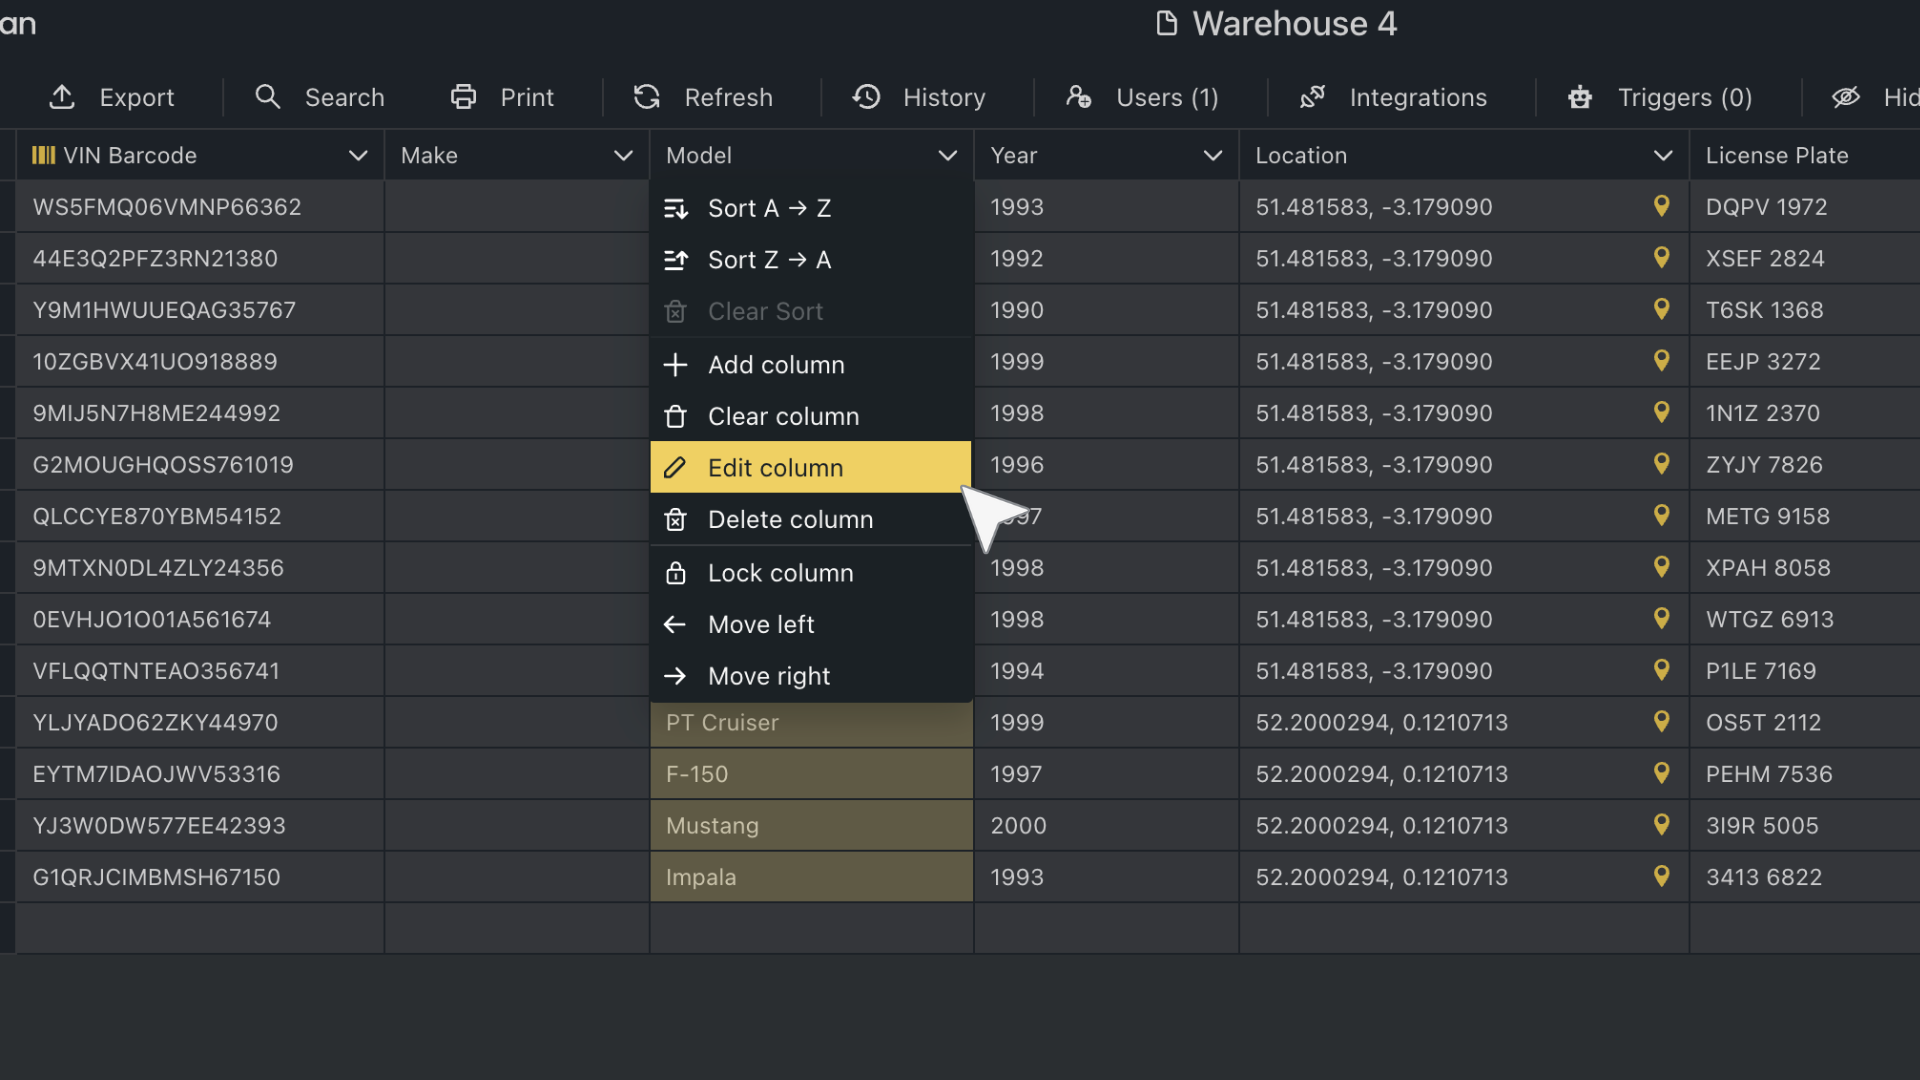
Learn more about the data field customisation options.
Updating data fields
Rows will expand to show all the fields in your sheet, allowing you to make multiple edits without having to open each field individually. If a user has permission to ‘update’, they can utilise this feature.
Adding more users
You can invite users to collaborate on your sheet and set individual permissions. Each user automatically has update access, which means they can download the Orca Scan mobile app, log in and start scanning barcodes into your sheet.
To add users, open the Users tab at the top of the Orca Scan web app. If other users share your email domain, we’ll suggest them automatically.
Learn more about the relationship between users and sheets.
Sheet permissions
The creator of the sheet is considered it’s owner. Only they can modify both the subscription and the sheet. When adding users to a sheet, you can manage their permissions to add, edit, or update records.
The four permissions are: Can update, Can delete, Can export and Can admin
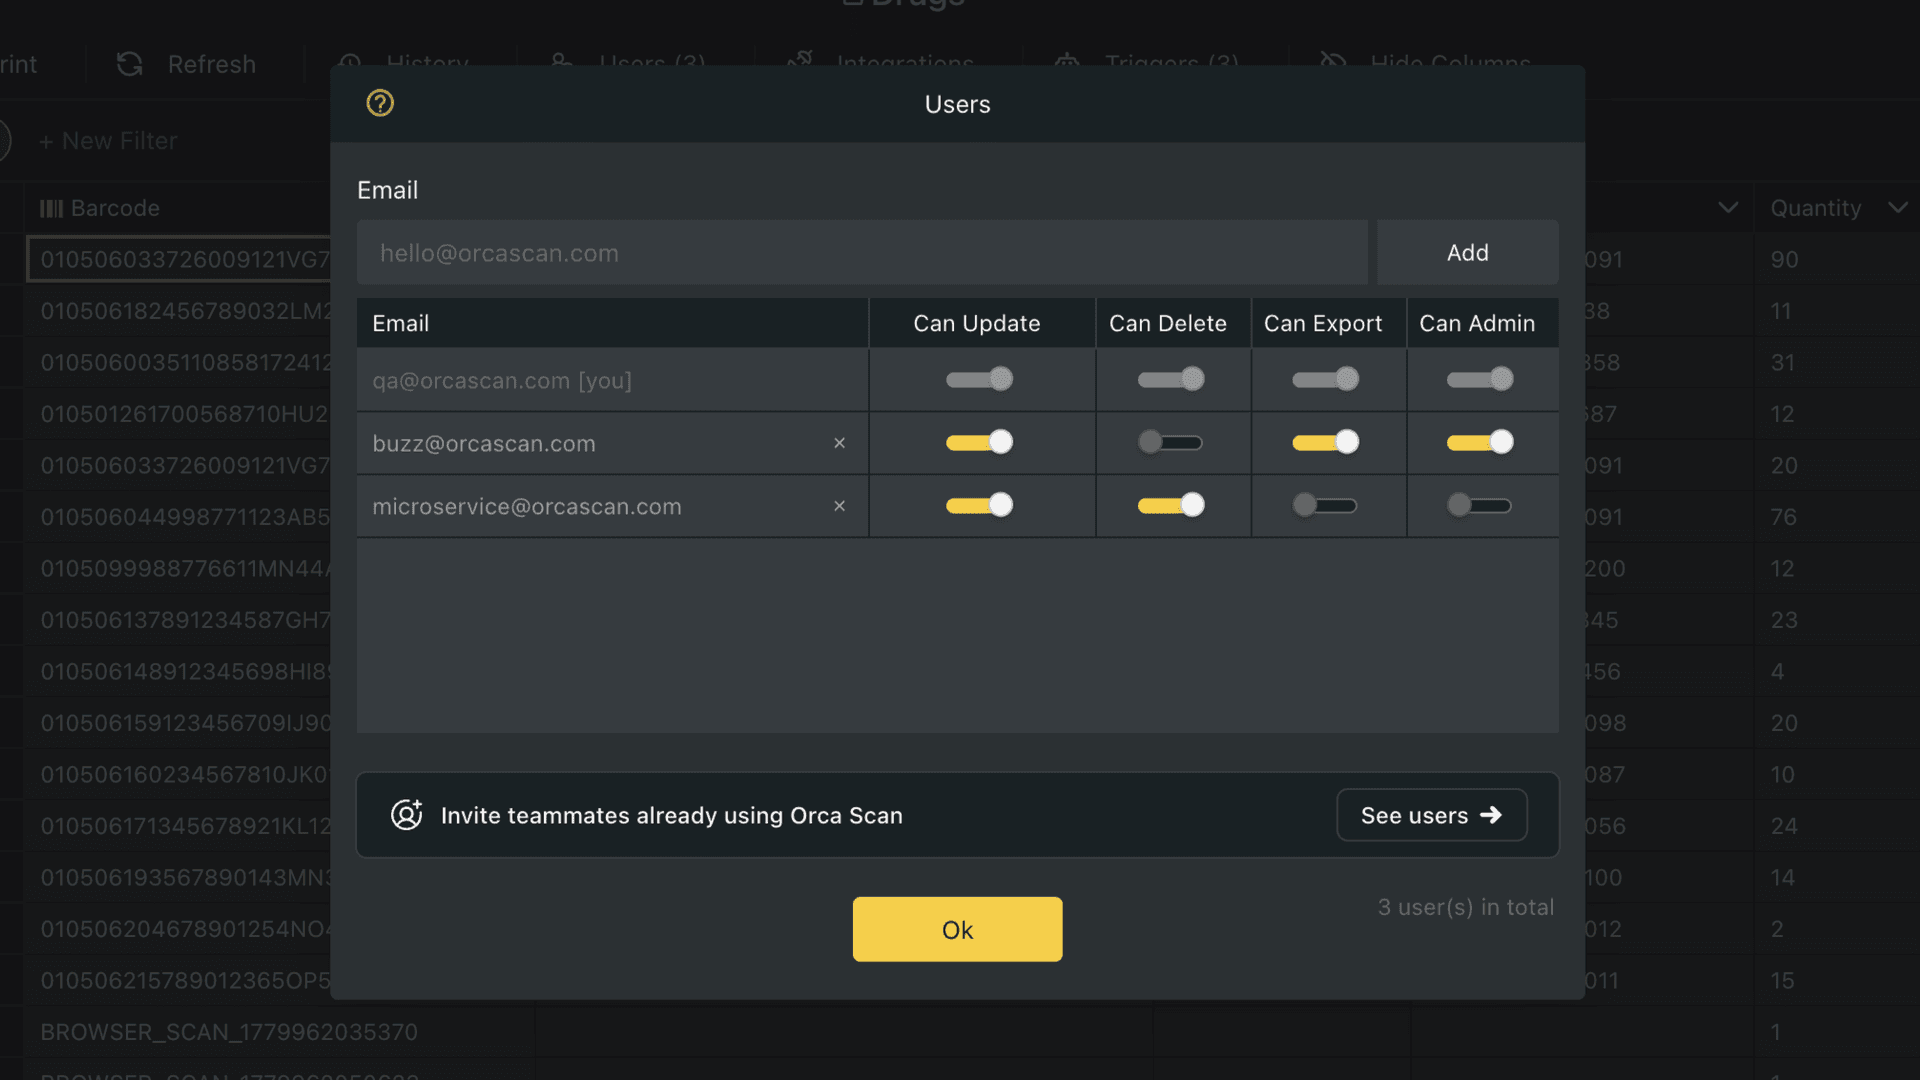
| Permission | Description |
|---|---|
| Can Update | User can make changes to existing data and add new items |
| Can Delete | User can delete an item from the sheet |
| Can Export | User can export sheet data from both the web and mobile |
| Can Admin | User can add, update, delete, export and alter sheet structure |
Learn more about adding users and setting user permissions.
Sheet settings and options
Each sheet has its own set of settings that work independently from other sheets. To access these settings, right-click on the sheet tab. There are seven options: Clear Delete, Rename, Duplicate, Transfer, Date Time and Integration:
| Option | Description |
|---|---|
| Clear | Remove all entries from the sheet while keeping its structure intact |
| Delete | Permanently remove the sheet and its data |
| Rename | Easily change the sheet’s name to reflect its content better |
| Duplicate | Create a copy of the sheet with options to include the users, data, history and triggers |
| Transfer | Transfer the ownership of the sheet to another user |
| Date Time | Customise date and time formats for region-specific needs |
| Integration | Connect your sheet to external applications or source data from other sheets and applications |
Searching your data
There is a search icon in the toolbar above your sheet. This functionality makes it easier to find the needle in the haystack of data with speed. You can search by barcode, name, location and any other data field you have set up for your sheet.
Exploring the history log
For true visibility throughout your workspace, Orca Scan’s history tab (found in the toolbar above your sheet) allows you to view historical changes on selected rows, all rows and deleted rows. You can also search through historical data for better auditing.
Learn more about tracking historical changes in your sheet.
Toggling sheet views
Data scanned into Orca Scan automatically gets tagged with location coordinates from the Orca Scan mobile app (when the device’s location services are enabled) to show you where they were last scanned. In the bottom left of the web app, there are two viewing options for your sheet: Data and Map. The data view is the default option where you’ll see the rows, columns and cells. The map view will show you the locational coordinates of each asset’s last scan.
Learn how to visualise your data effectively on an asset map.
Integrating Orca Scan
Orca Scan’s API is extremely flexible, making integrating with your existing system easy. Our prebuilt integrations, such as Google Sheets, Microsoft Excel and Zapier, make it even easier to connect directly with your favourite tools. Find our available integrations in the toolbar.
Learn more about integrating with Orca Scan.
Building conditional triggers
Having full access to barcode data is one thing, but automated conditional logic is another. Head to the toolbar to find ‘Triggers’, where you’ll be able to build out comprehensive “if this, then that” scenarios and notification alerts triggered by specific events.
Learn more about how to use automated conditional triggers.
Formulas
Add a column with a Formula data-type to calculate total weights, item quantities versus total value, or cost and quantity.
Learn more about how to maximise the power of formulas in your sheet.
Managing data sources
Easily source data from other Orca Scan sheets to create a master sheet of all your data. To manage data sources, tap the Integrations tab, go to Data Sources, and select the sheet you want to pull from. This allows you to sync data automatically across multiple sheets, keeping your data consistent.
Learn More about sharing and sourcing data between sheets.
Hiding columns
Focus on the most important information in your sheet by hiding columns. To hide a column, click the column header, select Column Options, and choose Hide Column. You can always unhide columns later if you want to see them again.
Locking columns
Lock columns in your Orca Scan sheet so they can be viewed but not edited, helping to prevent accidental changes. To lock a column, click the column header, choose Column Options, and select Lock Column. You can unlock columns at any time if you need to make changes.
Best practices
1. Controlling data entry with field rules
Ensure high-quality data entry by applying rules to the fields and making them Required, Read-only or hiding them altogether.
2. Using relevant field types
All fields have unique properties. By default, you have text, date, and quantity fields, but there are many more custom fields, such as GPS, timestamps, drop-down lists, and boolean fields - view them all here.
To discover what else you can do using Orca Scan or to find step-by-step directions on how to use some of our features, head over to our guides or book a free product demo.
Next steps
Have a question about the Orca Scan web app?
We’re always happy to help; chat with us live or drop us an email.